


Navigating markets with minimal price movement? The Short Iron Butterfly strategy is tailored for conditions where the underlying asset is expected to stay within a narrow range. By strategically combining short and long options, this approach allows traders to earn premium income while capping potential losses.
In this blog, we’ll break down the mechanics of the Short Iron Butterfly, discuss entry and exit criteria, outline risk management methods, and explain how to adapt the strategy for varying market conditions.
Understanding the Short Iron Butterfly Strategy
The Short Iron Butterfly is a neutral, four-leg options strategy designed for low volatility. It profits when the underlying price remains near a central strike, primarily from premium decay. The structure is as follows:
-
Sell an At-the-Money (ATM) Call Option
-
Sell an ATM Put Option
-
Buy an Out-of-the-Money (OTM) Call Option (Higher Strike)
-
Buy an OTM Put Option (Lower Strike)
This results in a net credit trade. The long OTM options act as protective barriers against unexpected price swings, ensuring limited risk.
Iron Butterfly Variations
-
Short Iron Butterfly: A neutral strategy designed to profit from minimal price movement and low volatility.
-
Long Iron Butterfly: A more aggressive approach aimed at capturing profits from large directional moves (though not covered in this blog).
Unlike straddles or strangles, this strategy offers a symmetric payoff structure with capped losses and gains, emphasizing premium collection with a defined payoff structure.
How the Short Iron Butterfly Strategy Works
1. Entry Criteria
Eligible Markets: The Short Iron Butterfly performs best when the underlying price is relatively stable. Ideal instruments include:
-
Indices: NSE’s NIFTY 50, FIN NIFTY and US-based S&P 500 (SPX), Nasdaq 100 (QQQ).
-
Stocks: Large-cap stocks with relatively low volatility, such as NFLX, AAPL, MSFT, JNJ.
Strike Price Selection: The Short Iron Butterfly involves selling ATM options while purchasing OTM options for protection. The strike price selection depends on market expectations and risk appetite:
-
Narrower Strikes: Generate higher premium but require the underlying asset to stay closer to the central strike for profitability.
-
Wider Strikes: Provide a broader safety net but reduce the net premium collected.
Expiry Selection: The choice of expiry plays a significant role in how the strategy performs:
-
Weekly Expiry: Favored for shorter-term trades aiming to capture rapid premium decay.
-
Monthly Expiry: Offers a more gradual premium decay, providing a longer window to remain near the central strike price.
Lot Size & Positioning: Position sizing should be carefully calculated based on the trader’s risk tolerance and market outlook. The goal is to maintain a balanced position where potential loss remains within acceptable limits.
Timeframes: Although compatible with timeframes ranging from 1 to 60 minutes, the strategy performs best on the 1-minute chart, enabling sharper entry and faster exit responsiveness.
2. Exit Rules & Re-Entry Strategy
The strategy includes structured exit and re-entry rules for risk control and profit optimization.
The strategy exits when:
-
Profit Target Reached: When the net premium collected reaches a predetermined target, allowing the trader to lock in profits.
-
Market Breakout Occurs: If the underlying asset experiences a sharp move away from the central strike price, the position is closed to prevent further losses.
Re-Entry Logic
- Re-entry after a breakout or further drop in volatility allows repositioning around a new ATM strike. The reference price is updated upon breach, and the strategy waits for price to reverse by a defined offset before re-entering.
Alternative Exit Strategies
-
Partial Profit Booking: If one leg of the trade reaches profitability while the other remains active, the profitable side can be closed, preserving gains.
-
Time-Based Exit: Instead of waiting until expiration, traders may choose to exit after a set percentage of the expiry period has passed, especially if the premium decay is nearing completion.
-
Stop-Loss Based Exit: Traders can set predefined stop-loss thresholds for the overall strategy or individual legs. If the unrealized loss crosses this threshold—based on premium changes or mark-to-market value—the position is exited to limit downside risk.
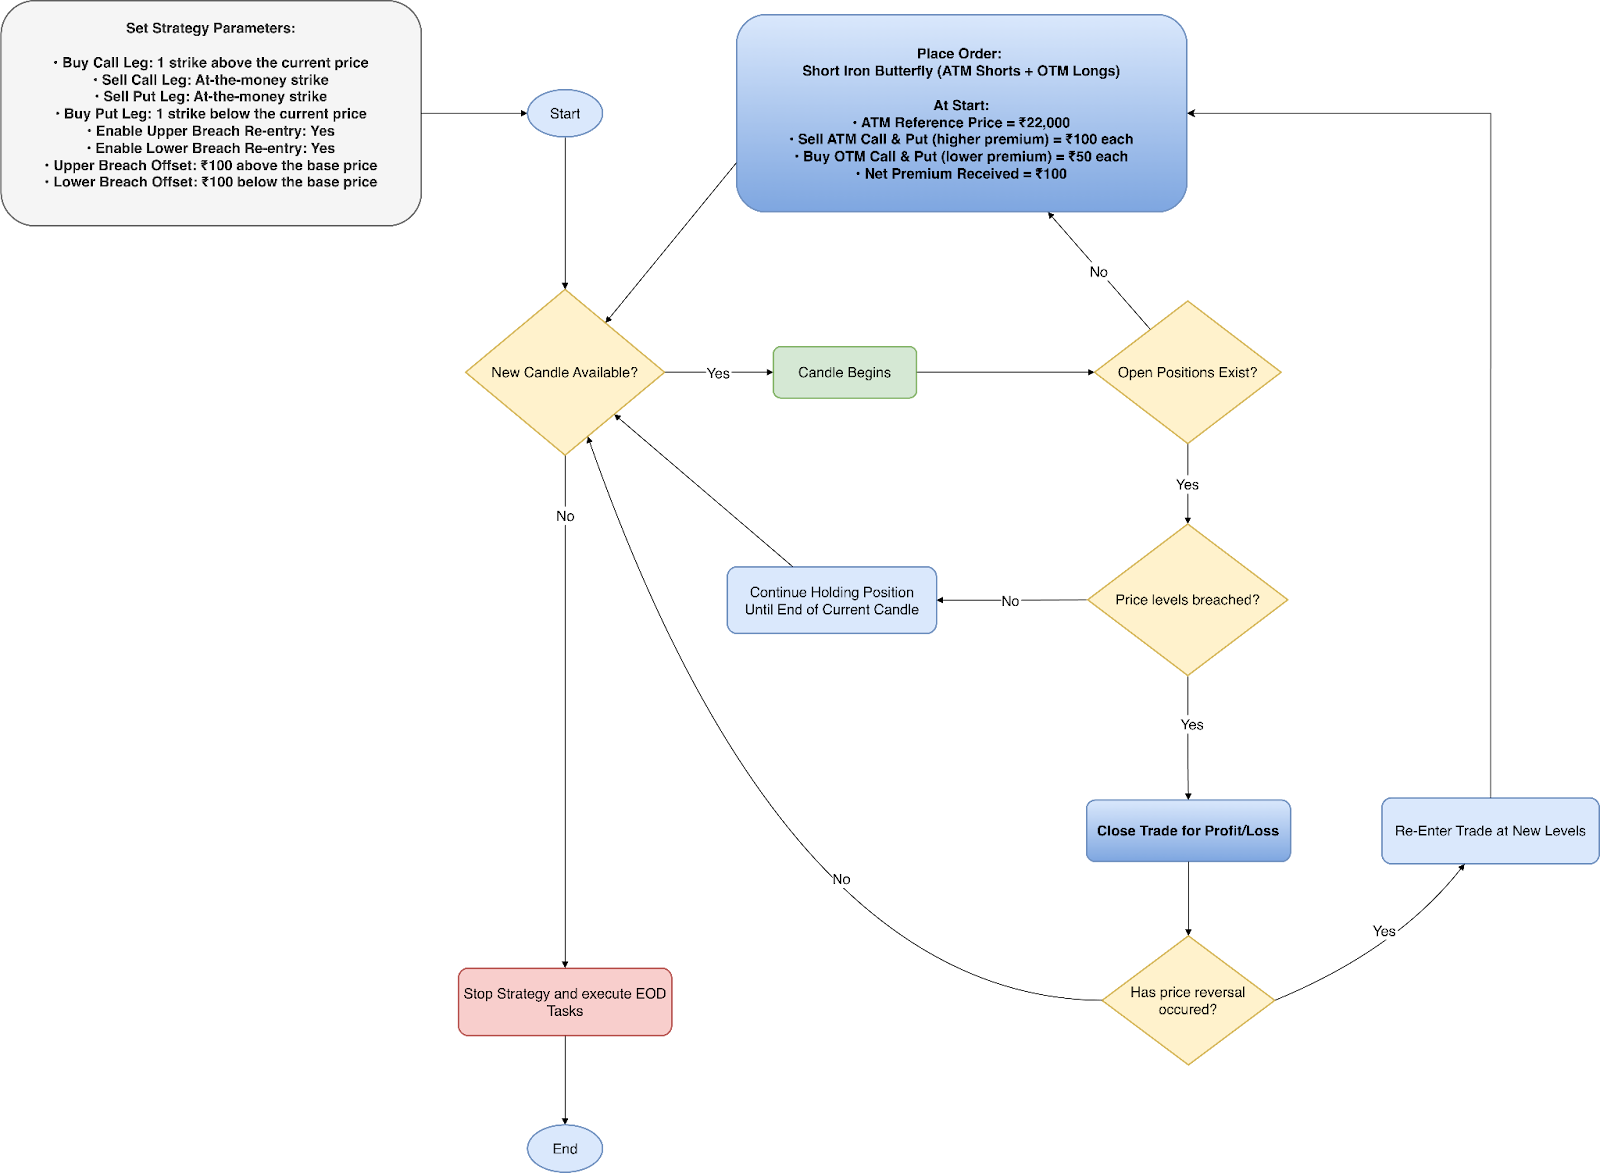
Figure 1: Short Iron Butterfly Strategy Execution Flowchart
(Values align with the first sample in the upcoming Profit & Loss Calculations section)
This section details the Python implementation of a Short Iron Butterfly strategy with fixed strike spacing and automated re-entry logic.
Selecting Instruments and Strikes for Entry
def strategy_select_instruments_for_entry(self, candle, instruments_bucket):
   selected_instruments, meta, executed_tradingsymbol_suffix = [], [], set()

   for base_instrument in instruments_bucket:
       self.logger.info(
           f"Checking entry/re-entry conditions for base instrument: {base_instrument} | "
           f"Determining OTM option instruments and verifying if CE/PE orders are already placed."
       )
       # Define a list of tuples for managing legs, their types, and relevant orders
       leg_wise_list = [
           ("ce_buy_leg", 'CE', OptionsStrikeDirection.OTM.value, self.no_of_otm_strikes_buy_ce_leg, 'BUY',
            self.child_instrument_main_orders_ce[base_instrument].get("ce_buy_leg") if self.child_instrument_main_orders_ce.get(base_instrument) else None),
           ("ce_sell_leg", 'CE', OptionsStrikeDirection.ATM.value, 0, 'SELL',
            self.child_instrument_main_orders_ce[base_instrument].get("ce_sell_leg") if self.child_instrument_main_orders_ce.get(base_instrument) else None),
           ("pe_buy_leg", 'PE', OptionsStrikeDirection.OTM.value, self.no_of_otm_strikes_buy_pe_leg, 'BUY',
            self.child_instrument_main_orders_pe[base_instrument].get("pe_buy_leg") if self.child_instrument_main_orders_pe.get(base_instrument) else None),
           ("pe_sell_leg", 'PE', OptionsStrikeDirection.ATM.value, 0, 'SELL',
            self.child_instrument_main_orders_pe[base_instrument].get("pe_sell_leg") if self.child_instrument_main_orders_pe.get(base_instrument) else None)
       ]

       current_underlying_price = self.broker.get_ltp(base_instrument)

       # Calculate re-entry conditions based on the latest price
       flag_upper_re_entry = (self.flag_upper_breach_possible_reentry and (self.base_price_post_breach - current_underlying_price) >= self.price_breach_upper_offset)
       flag_lower_re_entry = (self.flag_lower_breach_possible_reentry and (self.base_price_post_breach - current_underlying_price) <= - self.price_breach_lower_offset)

       # Check if there are no active orders (PE/CE legs), re-entry check has been triggered
       flag_empty_orders = (not self.child_instrument_main_orders_pe and not self.child_instrument_main_orders_ce)
       flag_re_entry_triggered = (self.flag_upper_breach_possible_reentry or self.flag_lower_breach_possible_reentry)

       # Proceed only if no open orders or if the re-entry conditions are met with existing orders
       if flag_empty_orders and (flag_upper_re_entry or flag_lower_re_entry or not flag_re_entry_triggered):
           for leg, tradingsymbol_suffix, strike_direction, no_of_strikes, action, main_order in leg_wise_list:
               if tradingsymbol_suffix not in executed_tradingsymbol_suffix:
                   self.options_instruments_set_up_all_expiries(base_instrument, tradingsymbol_suffix, current_underlying_price)
                   executed_tradingsymbol_suffix.add(tradingsymbol_suffix)

               child_instrument = self.get_child_instrument_details(base_instrument, tradingsymbol_suffix, strike_direction, no_of_strikes)  # Retrieve child base_instrument details for the given base_instrument
               self.instruments_mapper.add_mappings(base_instrument, child_instrument)  # Maps each base_instrument to its child in the instruments' mapper for further processing.
               selected_instruments.append(child_instrument)
               meta.append({"leg": leg, "action": action, "base_instrument": base_instrument, "tradingsymbol_suffix": tradingsymbol_suffix})

       if flag_re_entry_triggered:
           self.flag_lower_breach_possible_reentry = self.flag_upper_breach_possible_reentry = False  # Resets upper and lower price breach conditions after re-entry is triggered and acted upon

   return selected_instruments, meta
Code Explanation:
1. OptionsStrikeDirection.OTM.value/ATM.value:
("ce_buy_leg", 'CE', OptionsStrikeDirection.OTM.value, ...)
("ce_sell_leg", 'CE', OptionsStrikeDirection.ATM.value, ...)
-
Though these resolve to simple strings ("OTM" / "ATM"), using the OptionsStrikeDirection enum improves code clarity, consistency, and maintainability.
-
It avoids hardcoding strings, supports autocomplete, and allows future extension (e.g. adding strike rules) without refactoring logic elsewhere.
2. Re-entry condition logic (sign inversion)
flag_lower_re_entry = (
    self.flag_lower_breach_possible_reentry and
    (self.base_price_post_breach - current_underlying_price) <= - self.price_breach_lower_offset
)
This part is often confusing because of the negative comparison.
Here’s why it’s written this way:
-
After a lower breach, the price had fallen sharply.
-
You only want to re-enter if the price has risen back up (i.e., reversed direction).
-
Hence:
current_price - base_breach_price ≥ offset
becomes:
(base_breach_price - current_price) ≤ -offset
Symmetric re-entry is triggered when price reverses by a set offset after a breach. (See Exit Rules section for logic reference.)
3. flag_empty_orders
flag_empty_orders = (
    not self.child_instrument_main_orders_pe and
    not self.child_instrument_main_orders_ce
)
-
This is not checking individual leg orders, but the entire PE/CE order dictionary.
-
It only returns True if both PE and CE positions are entirely empty.
-
So, if even one leg is active, this flag is False, and the strategy won’t re-enter.
-
-
This simplifies checking for full position closure before initiating re-entry.
4. executed_tradingsymbol_suffix
if tradingsymbol_suffix not in executed_tradingsymbol_suffix:
    self.options_instruments_set_up_all_expiries(...)
-
This prevents redundant setup of expiry instruments for the same 'CE' or 'PE' suffix.
-
Even though the strategy loops over 4 legs, it only needs to set up 'CE' once (not for both buy/sell), and similarly only once for 'PE'.
-
This flag ensures set_up_all_expiries() is only triggered once per option type.
5. Mapping instruments for later tracking
-
This line updates an internal map so that the strategy can later track which specific option instruments are tied to each base instrument (e.g., NIFTY or BANKNIFTY).
-
It’s essential for placing, monitoring, and exiting positions later on, but isn’t directly used in this function’s return values.
Creating an Order for a Position
def strategy_enter_position(self, candle, instrument, meta):

   child_instrument = instrument
   base_instrument = self.instruments_mapper.get_base_instrument(child_instrument)
   self.base_price_post_breach = self.broker.get_ltp(base_instrument)  # Initializes base reference price with trade entry price; updated only after breach.
   if meta['action'] == 'BUY':
       _order = self.broker.BuyOrderRegular(instrument=child_instrument, order_code=self.order_code, order_variety=BrokerOrderVarietyConstants.MARKET, quantity=self.number_of_lots * child_instrument.lot_size)
   else:
       _order = self.broker.SellOrderRegular(instrument=child_instrument, order_code=self.order_code, order_variety=BrokerOrderVarietyConstants.MARKET, quantity=self.number_of_lots * child_instrument.lot_size)

   if check_order_placed_successfully(_order):
       if meta["tradingsymbol_suffix"] == "CE":
           self.child_instrument_main_orders_ce.setdefault(meta['base_instrument'], {})[meta['leg']] = _order
       else:
           self.child_instrument_main_orders_pe.setdefault(meta['base_instrument'], {})[meta['leg']] = _order
   else:
       # Protection logic incase any of the legs fail to get placed - this will help avoid having naked positions
       self.logger.critical('Order placement failed for one of the legs. Exiting position for other legs, if possible and stopping strategy.')
       self.exit_all_positions_for_base_instrument(base_instrument)
       raise ABSystemExit

   return _order
Code Explanation:
1. Setting Base Price for Breach Logic
- Initializes and updates the breach reference price — first at position entry and again after any breach — ensuring that re-entry conditions are evaluated relative to the latest pivot point.
2. Storing Orders by Leg
self.child_instrument_main_orders_ce.setdefault(meta['base_instrument'], {})[meta['leg']] = _order
-
Uses setdefault() to ensure that a nested dictionary exists for each base instrument.
-
This allows storing each leg’s order (ce_buy_leg, pe_sell_leg, etc.) individually under the correct instrument, useful for later tracking and position exit.
3. Handling Partial Order Failure
-
If one of the legs fails to place, the system immediately exits any placed legs for that instrument.
-
This avoids naked directional exposure and stops the strategy to prevent inconsistent state.
Exit Condition Check Based on Price Breach
def check_exit_condition(self, base_instrument):
   """ Determines if the strategy should exit based on price breach conditions. Returns True if exit condition is met. """

   current_underlying_price = self.broker.get_ltp(base_instrument)
   self.flag_upper_breach_possible_reentry = current_underlying_price - self.base_price_post_breach >= self.price_breach_upper_offset if self.price_breach_upper_offset else False
   self.flag_lower_breach_possible_reentry = current_underlying_price - self.base_price_post_breach <= - self.price_breach_lower_offset if self.price_breach_lower_offset else False

   if self.flag_upper_breach_possible_reentry or self.flag_lower_breach_possible_reentry:
       breach_type_str = 'Upper' if self.flag_upper_breach_possible_reentry else 'Lower'
       self.logger.info(f'{breach_type_str} price thresholds breached. Exiting current positions for all legs. Checking re-entry condition in next candle.')
       self.base_price_post_breach = current_underlying_price  # Current ltp becomes new base reference price in case of breach
       return True

   return False
Code Explanation:
1. Breach Flag Logic (Directional Reversal Handling)
self.flag_upper_breach_possible_reentry = (
    current_underlying_price - self.base_price_post_breach >= self.price_breach_upper_offset
    if self.price_breach_upper_offset else False
)

self.flag_lower_breach_possible_reentry = (
    current_underlying_price - self.base_price_post_breach <= -self.price_breach_lower_offset
    if self.price_breach_lower_offset else False
)
-
These flags indicate that the price has moved significantly from the post-breach reference.
-
Handles directional reversals using offset thresholds. (See Exit Rules section for detailed logic.)
-
Offsets are optional — logic only runs if they’re explicitly enabled.
2. Resetting the Breach Reference After Exit
-
Updates the base reference price to support re-entry logic, as described in the Exit Rules section.
-
It ensures that subsequent re-entry logic uses the breached price as the new anchor.
Validation in Short Iron Butterfly
def validate_parameters(self):

   # Validate expiry dates
   if len(self.get_allowed_expiry_dates()) != self.number_of_allowed_expiry_dates:
       self.logger.info(f"Allowed expiry dates: {self.number_of_allowed_expiry_dates}, got {len(self.get_allowed_expiry_dates())}. Exiting...")
       raise ABSystemExit

   # Validate parameters
   for param in (self.price_breach_upper_offset, self.price_breach_lower_offset):
       check_argument(param, "extern_function", is_nonnegative_int_or_float, "PRICE_BREACH_*_OFFSET should be a non-negative number (>= 0.0)")

   for param in (self.no_of_otm_strikes_buy_ce_leg, self.no_of_otm_strikes_buy_pe_leg):
       check_argument(param, "extern_function", is_positive_int, "NUMBER_OF_OTM_STRIKES_* parameters should be positive integers (> 0)")

   for param in [self.strategy_parameters.get("ALLOW_UPPER_PRICE_BREACH", 0), self.strategy_parameters.get("ALLOW_LOWER_PRICE_BREACH", 0)]:
       check_argument(param, "extern_function", lambda x: isinstance(x, int) and x in [0, 1], f"ALLOW_*_PRICE_BREACH flags should be either 0 (False) or 1 (True)")
1. Ensuring Valid Expiry Data
Why It Matters:
The strategy requires a consistent expiry date across all four legs. If the available expiry count doesn’t match expectations, it may indicate missing or invalid instrument data — risking failed or incomplete order placement.
Validation Control:
if len(self.get_allowed_expiry_dates()) != self.number_of_allowed_expiry_dates:
    self.logger.info(...)
    raise ABSystemExit
-
Blocks execution when expiry data is inconsistent
-
Avoids placing orders with unavailable or mismatched contracts
2. Preventing Illogical Breach Thresholds
Why It Matters:
PRICE_BREACH_x_OFFSET defines the minimum movement required to trigger an exit. If the offset is negative or unset, breach logic may misfire — either never activating or exiting immediately.
Validation Control:
for param in (self.price_breach_upper_offset, self.price_breach_lower_offset):
    check_argument(param, ..., is_nonnegative_int_or_float, ...)
-
Ensures exit triggers are realistic
-
Prevents unstable or premature position closures
3. Validating OTM Wing Distances
Why It Matters:
The protective buy legs must be positioned a certain distance from the ATM short strikes. If the strike offset is missing or zero, the strategy may become unbalanced or behave like a naked short straddle.
Validation Control:
for param in (self.no_of_otm_strikes_buy_ce_leg, self.no_of_otm_strikes_buy_pe_leg):
    check_argument(param, ..., is_positive_int, ...)
-
Ensures valid spacing for defined-risk payoff
-
Prevents distorted breakeven and risk-reward structure
4. Validating Re-entry Control Flags
Why It Matters:
Re-entry logic must be explicitly enabled using flags. If these aren’t set to 0 or 1, the strategy may re-enter unintentionally or fail to re-enter at all, breaking its defined flow.
Validation Control:
for param in [self.strategy_parameters.get("ALLOW_UPPER_PRICE_BREACH", 0),
              self.strategy_parameters.get("ALLOW_LOWER_PRICE_BREACH", 0)]:
    check_argument(param, ..., lambda x: isinstance(x, int) and x in [0, 1], ...)
-
Guarantees binary behavior for re-entry logic
-
Avoids inconsistent trade cycling during volatility
💡 Want to see the complete strategy? Check out the full implementation here.
Ideal Market Conditions
When to Use
Best used when price is expected to stay near a central strike in low-volatility conditions.
Typical scenarios include:
-
Earnings Announcements: After earnings releases, when volatility tends to decrease and the underlying asset stabilizes near a specific price.
-
Federal Reserve Meetings & Interest Rate Decisions: Following such events, when the market has already digested the information and is expected to remain stable.
-
Seasonal or Cyclical Periods: Times when the underlying asset is expected to exhibit limited movement based on historical trends.
-
Low Volatility Conditions: Markets with consistently low implied volatility, where sharp movements are unlikely.
Interpreting the Short Iron Butterfly Payoff Structure
The following payoff diagram illustrates the profit and loss dynamics of a short iron butterfly strategy. The values used correspond to those depicted in the flowchart.
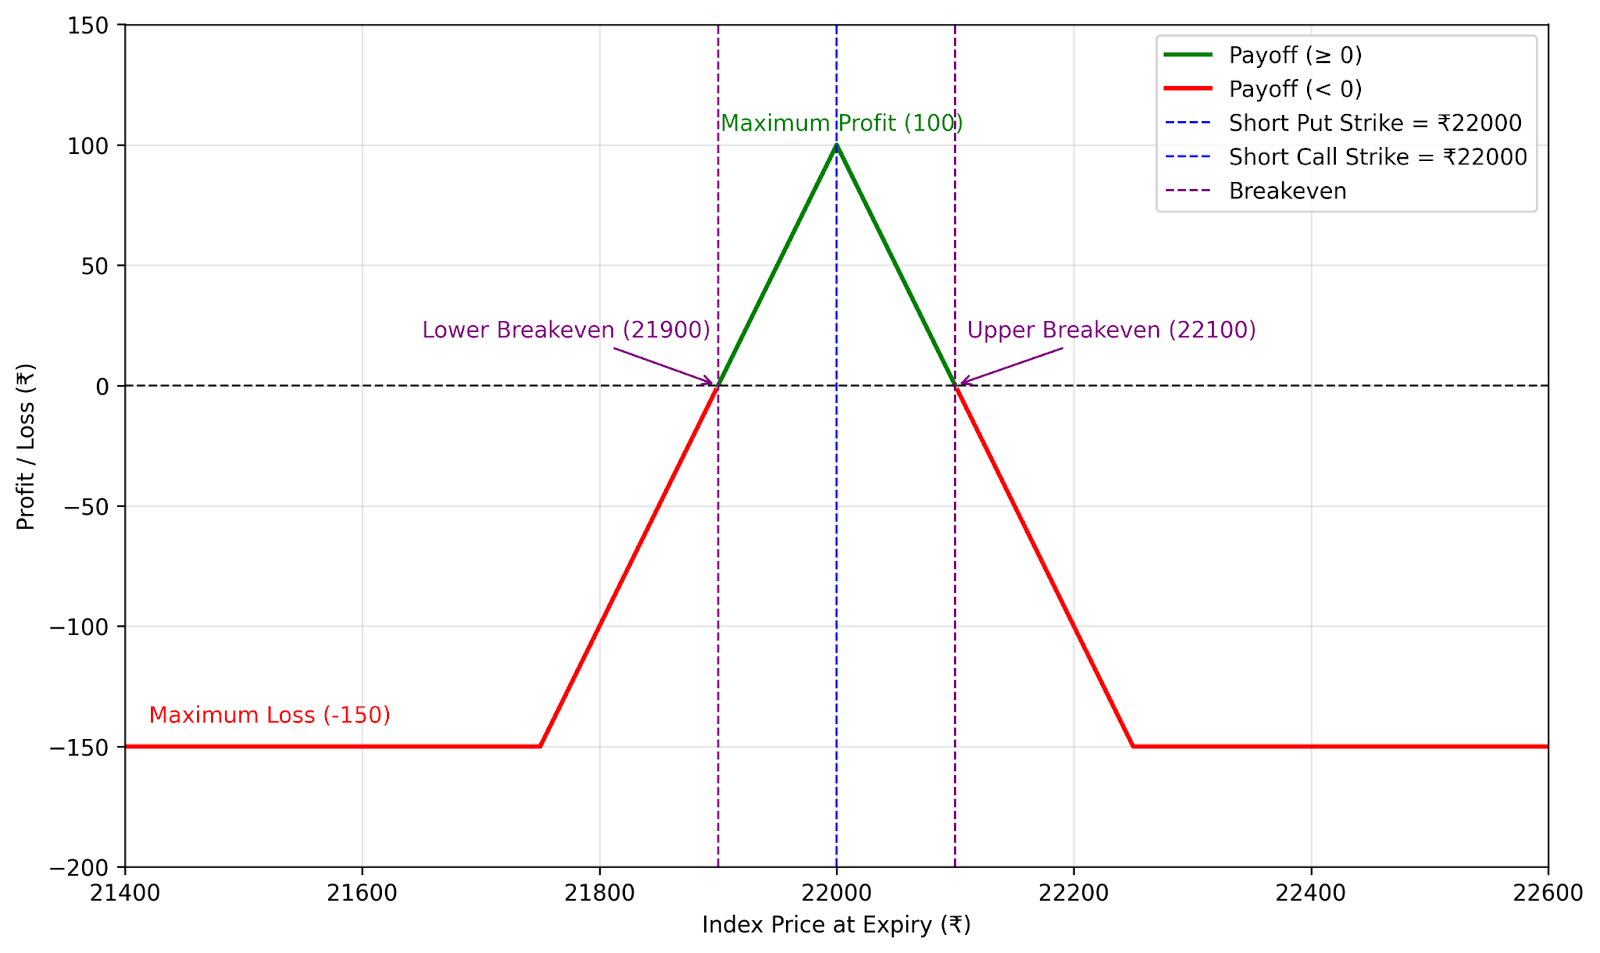
Figure 3: Profit and Loss Diagram
The green lines in the diagram represent the potential profit zone of a Short Iron Butterfly strategy. Unlike directional strategies, the Short Iron Butterfly profits from market stability, with the highest profit achieved when the underlying asset’s price settles precisely at the strike price of the sold at-the-money (ATM) options. This outcome allows the trader to retain the full premium collected at the start of the trade.
The red lines indicate potential losses, which are capped by the long out-of-the-money (OTM) call and put options. These protective positions ensure that losses remain limited even if the underlying price moves significantly away from the central strike. The maximum loss occurs when the price breaches the protective long options on either side.
Dashed lines highlight important levels:
-
Breakeven points: Where the profit/loss curve crosses zero. Beyond these points, the strategy incurs losses as the underlying asset’s price moves away from the ATM strikes.
-
Maximum profit: Achieved when the underlying asset’s price remains at the strike price of the sold options upon expiration, allowing the collected premium to be fully retained.
-
Maximum loss: Occurs when the underlying asset’s price moves beyond the protective long strikes, with losses limited by the net credit received during trade initiation.
Ideal for low-volatility setups, the Short Iron Butterfly benefits from time decay and limited price swings. The net credit offers a buffer against small deviations from the central strike.
The diagram above also resembles a Short Straddle with an implemented stop-loss mechanism. For more information on how the Short Straddle compares to this strategy, you can refer to our detailed blog: Short Straddle Blog
Profit & Loss Calculations for Low and High Risk Versions
1. Low-Risk Short Iron Butterfly
The earlier diagram illustrates a sample setup for the low-risk variant of the Short Iron Butterfly.
Key Parameters
-
Instrument: NIFTY 50 Index
-
Expiration Type: Nearest Monthly Expiry
-
Strike Selection:
-
Leg One: 1 strike away from ATM (OTM Put Buy)
-
Leg Two: ATM Strike (Put Sell)
-
Leg Three: ATM Strike (Call Sell)
-
Leg Four: 1 strike away from ATM (OTM Call Buy)
-
-
Re-entry Levels:
-
Lower Re-entry Level: 21,900
-
Upper Re-entry Level: 22,100
-
Calculations:
-
Total Premium Collected: ₹100 (Call) + ₹100 (Put) = ₹200
-
Total Premium Paid: ₹50 (Call) + ₹50 (Put) = ₹100
-
Net Premium Received = ₹200 – ₹100 = ₹100
- Maximum Profit Calculation:
Maximum Profit = Net Premium Received = ₹100
Occurs when the underlying asset’s price is exactly at ₹22,000 at expiration.
- Maximum Loss Calculation:
Maximum Loss = Strike Difference – Net Premium Received = ₹250 – ₹100 = ₹200
Occurs when the underlying asset’s price is below ₹21,750 or above ₹22,250 at expiration.
-
Breakeven Points:
-
Lower Breakeven: 22,000 – Net Premium Received = 22,000 – 100 = ₹21,900
-
Upper Breakeven: 22,000 + Net Premium Received = 22,000 + 100 = ₹22,100
-
P&L Outcomes:
| Underlying Spot Price | P&L With Re-entry | P&L Without Re-entry |
|---|---|---|
| ₹21,700 | –₹150 (Maximum Loss) | Re-entry Initiated |
| ₹21,900 (Lower BE) | ₹0 | ₹0 |
| ₹22,000 (ATM) | +₹100 (Maximum Profit) | +₹100 (Maximum Profit) |
| ₹22,100 (Upper BE) | ₹0 | ₹0 |
| ₹22,300 | –₹150 (Maximum Loss) | Re-entry Initiated |
2. High-Risk Short Iron Butterfly
The diagram below shows the profit and loss profile for a high-risk Short Iron Butterfly setup:
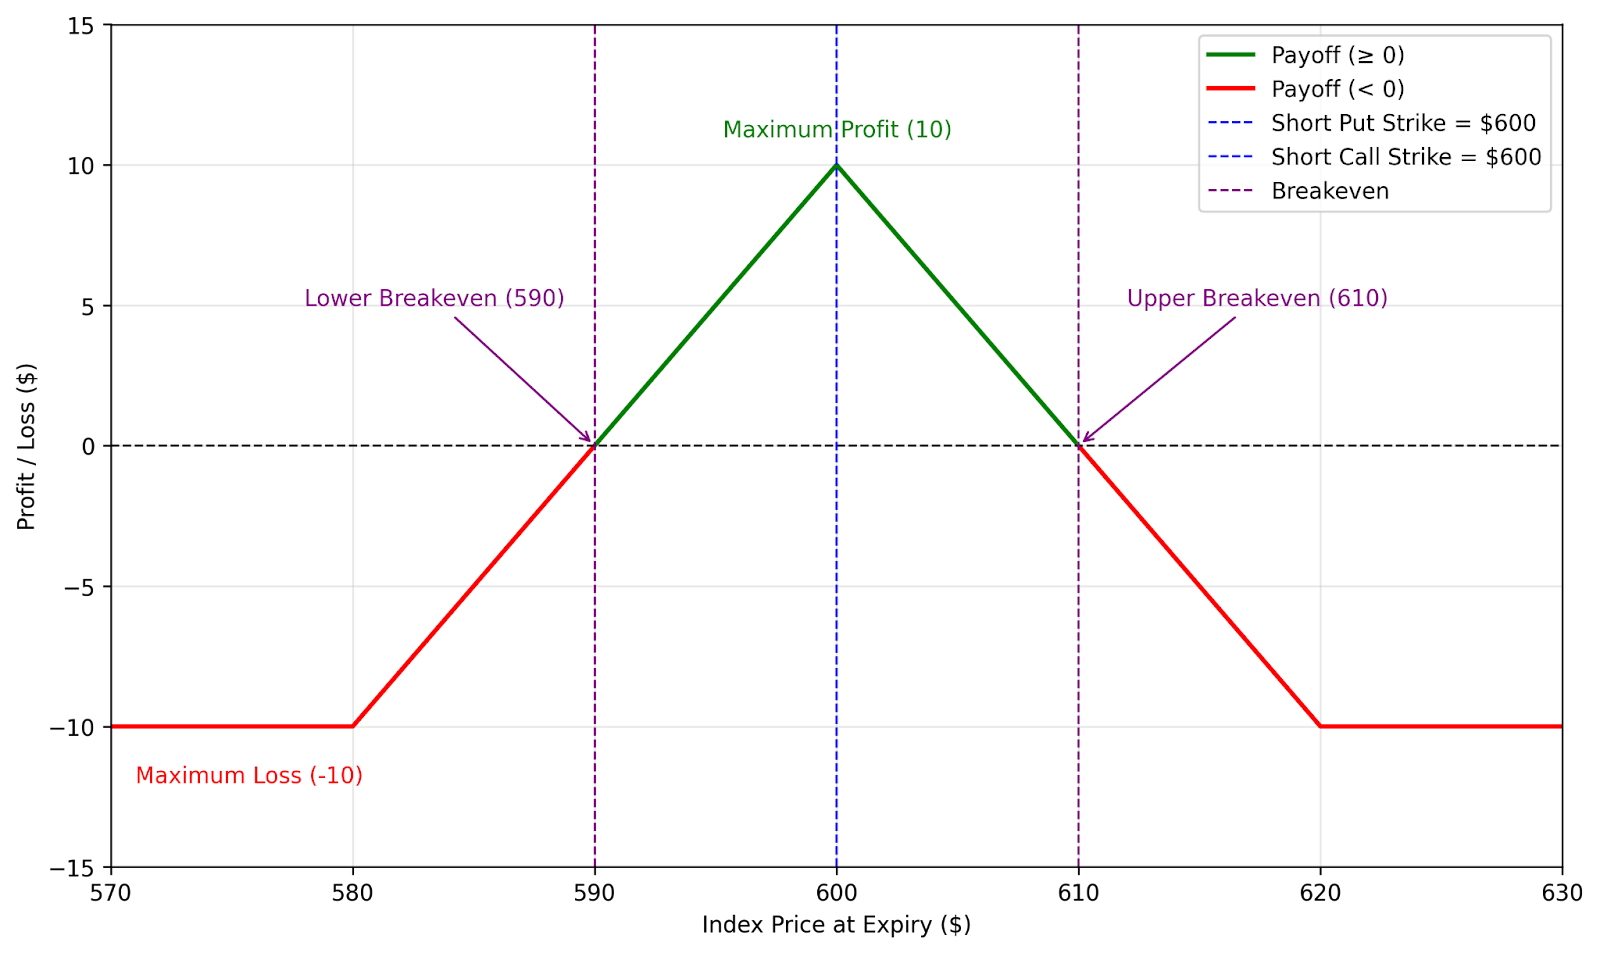
Figure 4: Profit and Loss Diagram - High Risk Version
Key Parameters
-
Instrument: Netflix (NFLX)
-
Expiration Type: Nearest Monthly Expiry
-
Strike Selection:
-
Leg One: 1 strike away from ATM (OTM Put Buy)
-
Leg Two: ATM Strike (Put Sell)
-
Leg Three: ATM Strike (Call Sell)
-
Leg Four: 1 strike away from ATM (OTM Call Buy)
-
-
Re-entry Levels:
-
Lower Re-entry Level: $590
-
Upper Re-entry Level: $610
-
Calculations:
-
Total Premium Collected: $13 (Call) + $13 (Put) = $26
-
Total Premium Paid: $8 (Call) + $8 (Put) = $16
-
Net Premium Received = $26 – $16 = $10
-
Maximum Profit Calculation:
Maximum Profit = Net Premium Received = $10
Occurs when the underlying asset’s price is exactly at $600 at expiration.
- Maximum Loss Calculation:
Maximum Loss = Strike Difference – Net Premium Received = $20 – $10 = $10
Occurs when the underlying asset’s price is below $590 or above $610 at expiration.
- Breakeven Points:
Lower Breakeven: Lower Put Strike – Net Premium Received = $600 – $10 = $590
Upper Breakeven: Upper Call Strike + Net Premium Received = $600 + $10 = $610
P&L Outcomes:
| Underlying Spot Price | P&L Without Re-entry | P&L With Re-entry |
|---|---|---|
| $590 | –$10 (Maximum Loss) | Re-entry Initiated |
| $590 (Lower BE) | $0 | $0 |
| $600 (ATM) | +$10 (Maximum Profit) | +$10 (Maximum Profit) |
| $610 (Upper BE) | $0 | $0 |
| $610+ | –$10 (Maximum Loss) | Re-entry Initiated |
The low-risk version targets steady returns with smaller premiums but lower probability of large losses, due to its compact breakeven zone.
In contrast, a High-Risk Short Iron Butterfly Strategy aims to collect a higher premium by taking on more exposure — this increases the potential return but also raises the chances of loss, especially if the underlying price moves sharply outside the breakeven levels.
Let’s understand the difference more clearly using a visual comparison.
Probability of Profit (POP): How Risk Affects Outcomes
The Probability of Profit (POP) reflects the likelihood that the underlying price stays within the breakeven range, where the strategy is profitable. It is typically estimated using the area under the Probability Density Function (PDF) outside the loss zones.
-
Balanced Strategy (Low Risk): In this setup (e.g., Netflix), the narrower breakeven range means the strategy is more centered and controlled. While the max profit is limited, the POP is stable — calculated at approximately 60%.
-
Aggressive Strategy (High Risk): Here, the breakevens are wider due to a larger premium collected, often under higher volatility. This boosts the max potential reward, but also increases the risk of price escaping the safe zone. The POP in this case is estimated around 50%.
The graph below visually compares the POP across both strategies.
-
Low-Risk Strategy: Shown as a narrower, taller PDF curve (blue) — reflecting lower implied volatility and a tighter distribution around the ATM price.
-
High-Risk Strategy: Visualized as a broader, flatter curve (red) — indicating higher volatility and a greater chance of wider price swings.

Figure 5: Comparing Profit Probability for Low and High-Risk Short Iron Butterfly Strategies
Comparing Short Iron Butterfly vs. Long Call Butterfly
Both the Short Iron Butterfly and the Long Call Butterfly are multi-leg options strategies designed for specific market scenarios. While the Short Iron Butterfly profits from stability and low volatility, the Long Call Butterfly seeks to capitalize on moderate price movement within a specified range. Despite their differences, they share structural similarities in construction but differ significantly in objectives and risk profiles.
Structural Differences
| Feature | Short Iron Butterfly | Long Call Butterfly |
|---|---|---|
| Option Types Used | 2 Short ATM Options (1 Call, 1 Put), 2 Long OTM Options (1 Call, 1 Put) | 2 Long Calls (Outer Strikes), 1 Short Call (Middle Strike) |
| Initial Trade Type | Credit (Net premium received) | Debit (Net premium paid) |
| Max Profit Scenario | Underlying price remains near ATM strike | Underlying price reaches the middle strike price |
| Max Loss Scenario | Significant price movement in either direction | Underlying price moves far from the middle strike |
| Margin Requirements | Typically lower due to balanced structure | Can be higher depending on strike selection |
| Implied Volatility Impact | Short Vega (Profits from declining IV) | Long Vega (Profits from rising IV) |
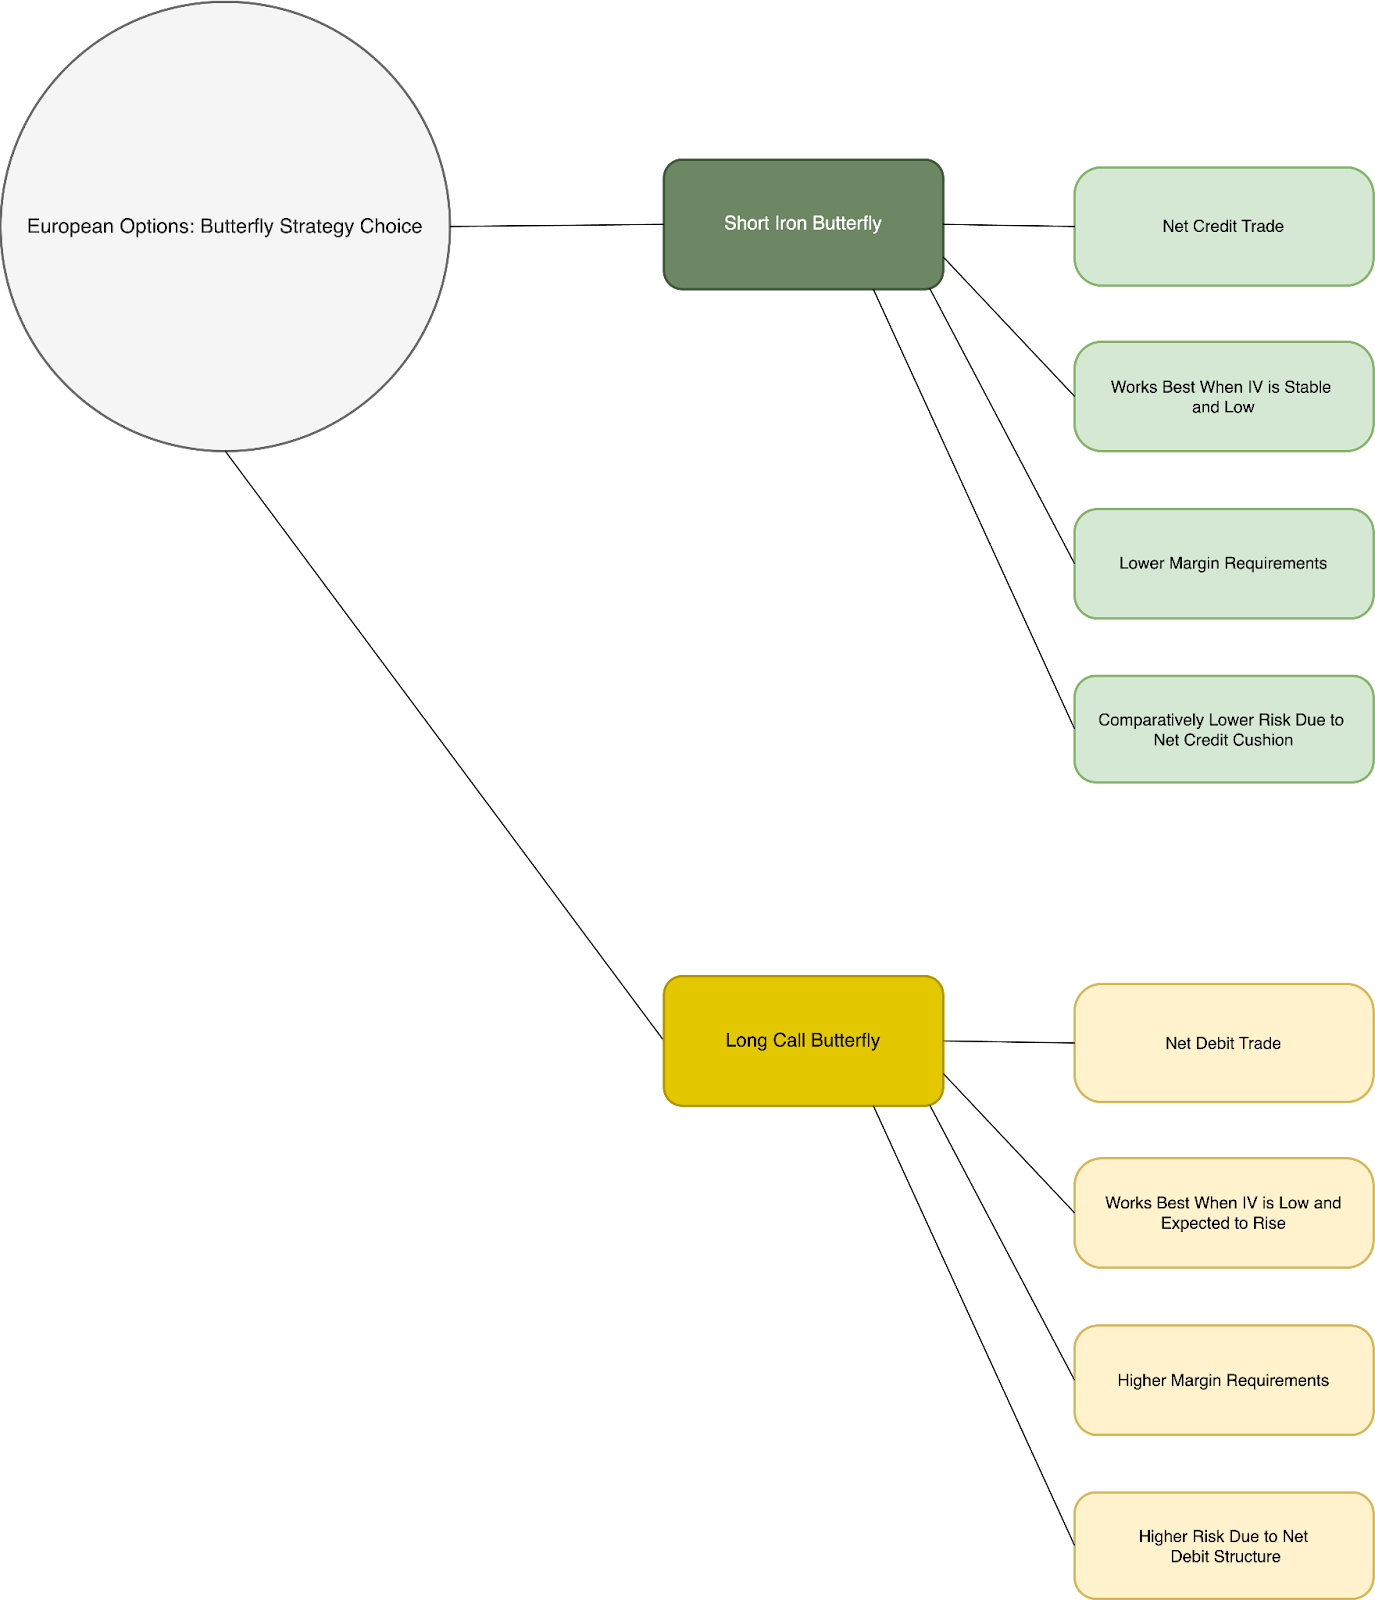
Figure 2: Short Iron Butterfly vs. Long Call Butterfly Mind Tree
Which One is Right for You?
-
If you anticipate minimal price movement and stable, low volatility, the Short Iron Butterfly may be the preferred choice. Its net credit structure provides a cushion against losses and allows for profit from time decay when the underlying asset remains near the strike price of the sold options.
-
On the other hand, if you expect some directional movement but within a limited range, the Long Call Butterfly may be more suitable. It offers a well-defined risk-reward structure but requires the underlying asset to approach the middle strike price for maximum profitability.
Refer to the Structural Differences Table above for a quick comparison of trade mechanics and risk considerations.
Customize the Strategy with Your Own Parameters!
The Short Iron Butterfly is a precision-based, non-directional strategy that rewards stability. It’s best suited for traders expecting low volatility and range-bound movement. This strategy can be adapted to suit your risk tolerance, market view, and profit objectives by adjusting strike selection, width between wings, premium targets, and trade management rules.
👉 For testing on the Phoenix platform of AlgoBulls, head over to our site now!
👉 A Jupyter notebook for this strategy is coming soon. Meanwhile, check out All Available Notebooks for Testing Custom Strategies!
Final Thoughts
The Short Iron Butterfly is not a static trade. It’s a defined-risk strategy that rewards consistency in stable markets, with flexibility for re-entry and adjustments.
Advanced Risk Management for Short Iron Butterfly
Though the Short Iron Butterfly offers limited loss and gain, traders can implement active adjustments to improve probability of profit and fine-tune exposure.
1. Rolling Strikes (Dynamic Adjustment)
Purpose: Respond to changing price levels or implied volatility shifts by moving strikes closer to or further from the ATM.
Effect: Captures more premium or reduces directional risk.
Use Case: When the underlying asset moves significantly away from the center strike or volatility skews change.
2. Rolling Positions (Adjusting Expiry)
Purpose: Gain more time for price to remain within the profitable breakeven zone.
Effect: Reduces time decay pressure and increases potential recovery.
Use Case: Useful when price is hovering near breakeven close to expiry or during range-bound drift.
3. Target Profit Mechanism
Purpose:
Define a clear exit point once a desired portion of the maximum profit has been achieved.
Effect:
Locks in gains early, reduces exposure to gamma risk near expiry, and avoids holding the position during sharp volatility spikes.
Use Case:
Commonly applied when 50–70% of the maximum premium has been captured. For example, if the total premium received is ₹100, the strategy may auto-exit once the position can be closed for ₹30–₹50. This ensures that most of the profit is realized while leaving minimal room for loss reversal.
By adjusting strike spacing, expiry, and profit targets, traders can align outcomes with their individual goals.
It balances risk and reward with clear loss limits and flexibility for live market adjustments.