


Expecting the market to move, but not too far? The Short Call Butterfly strategy is designed for scenarios where the underlying asset is likely to move away from a central price level, but within a defined range. By combining short and long call options at different strike prices, this strategy enables traders to benefit from volatility expansion while keeping risk capped through predefined targets, stop-losses, and disciplined re-entry rules.
In this blog, we’ll break down the mechanics of the Short Call Butterfly, discuss entry and exit criteria, outline risk management considerations, and explain how this strategy fits into different market conditions.
Understanding the Short Call Butterfly Strategy
The Short Call Butterfly is a three-strike, four-leg options strategy constructed using call options only. It is a net credit strategy that profits when the underlying price moves away from the middle strike, either upward or downward, but stays within the outer strikes.
Structure of a Short Call Butterfly
- Buy 1 In-the-Money (ITM) Call Option (Lower Strike)
- Sell 2 At-the-Money (ATM) Call Options (Middle Strike)
- Buy 1 Out-of-the-Money (OTM) Call Option (Higher Strike)
This structure results in a net credit, since the premium received from selling two ATM calls is greater than the premium paid for the ITM and OTM calls.
The bought calls on either side act as wings, limiting risk and defining the maximum loss.
How the Short Call Butterfly Strategy Works
1. Entry Criteria
Eligible Markets: The Short Call Butterfly is best suited for markets where a moderate price move is expected, but not an extreme breakout. Ideal instruments include:
-
Indices: NSE’s NIFTY 50, FIN NIFTY, and US-based indices such as the S&P 500 (SPX) and Nasdaq 100 (QQQ).
-
Stocks: Large-cap stocks with sufficient liquidity and option depth, such as AAPL, MSFT, NFLX, and JNJ.
Strike Price Selection: The Short Call Butterfly is constructed by selling ATM call options and buying call options on either side for risk protection. Strike selection plays a key role in defining the payoff profile:
-
Narrower Strikes: Results in a higher net credit but requires the underlying price to move decisively away from the middle strike to remain profitable.
-
Wider Strikes: Lowers the net premium collected but provides a broader profit zone and reduced sensitivity to small price fluctuations.
Expiry Selection: Expiry choice influences both risk and profitability:
-
Weekly Expiry: Suitable for short-term trades where a near-term price move or volatility expansion is expected.
-
Monthly Expiry: Provides more time for the anticipated move to develop, with slower time decay and smoother price action.
Lot Size & Positioning: Position sizing should align with the trader’s risk tolerance and capital allocation. Since the maximum loss is predefined, lot sizing can be optimized to ensure that the worst-case outcome remains within acceptable limits.
Timeframes: The Short Call Butterfly can be used across multiple timeframes from 1 to 60 minutes. Lower timeframes enable precise entries and active risk management, while higher timeframes support positional trades. For intraday setups, the 1-minute timeframe is recommended.
2. Exit Rules & Re-Entry Strategy
The Short Call Butterfly follows well-defined exit and re-entry rules to manage risk while adapting to changing market conditions.
The strategy exits an active position under the following scenarios:
-
Profit Target Reached:
The position is closed when the predefined profit target is achieved based on the net premium of the strategy, allowing profits to be locked in. -
Stop-Loss Triggered:
If the strategy’s net premium or mark-to-market loss breaches the configured stop-loss threshold, all positions are exited to cap downside risk. -
Underlying Price Threshold Breach:
The position is exited if the underlying price moves beyond the predefined upper or lower price thresholds, indicating a move against the expected price behavior.
Re-Entry Logic
Re-entry is triggered when the underlying price breaches either the upper or lower threshold and subsequently meets the re-entry conditions.
- Upon a threshold breach, the reference price is updated.
- The strategy waits for the price to move back by a predefined offset or confirmation condition.
- A new Short Call Butterfly is then established around the updated reference level, allowing the strategy to realign with current market conditions.
This ensures re-entries occur only after meaningful price movement and avoids repeated entries in unstable market phases.
Alternative Exit Strategies
-
Trailing Stop-Loss:
Instead of using a fixed stop-loss, a trailing stop-loss can be applied at the strategy level. As the position moves into profit, the stop-loss is dynamically adjusted to lock in gains while allowing the trade to continue benefiting from favorable price movement. If the trailing threshold is breached, the strategy exits all open positions. -
Partial Profit Booking:
Traders may optionally close part of the position once predefined profit conditions are met, while keeping the remaining structure active. -
Time-Based Exit:
Positions can be exited after a predefined portion of the expiry period has elapsed, especially when further premium decay is limited and risk exposure increases.
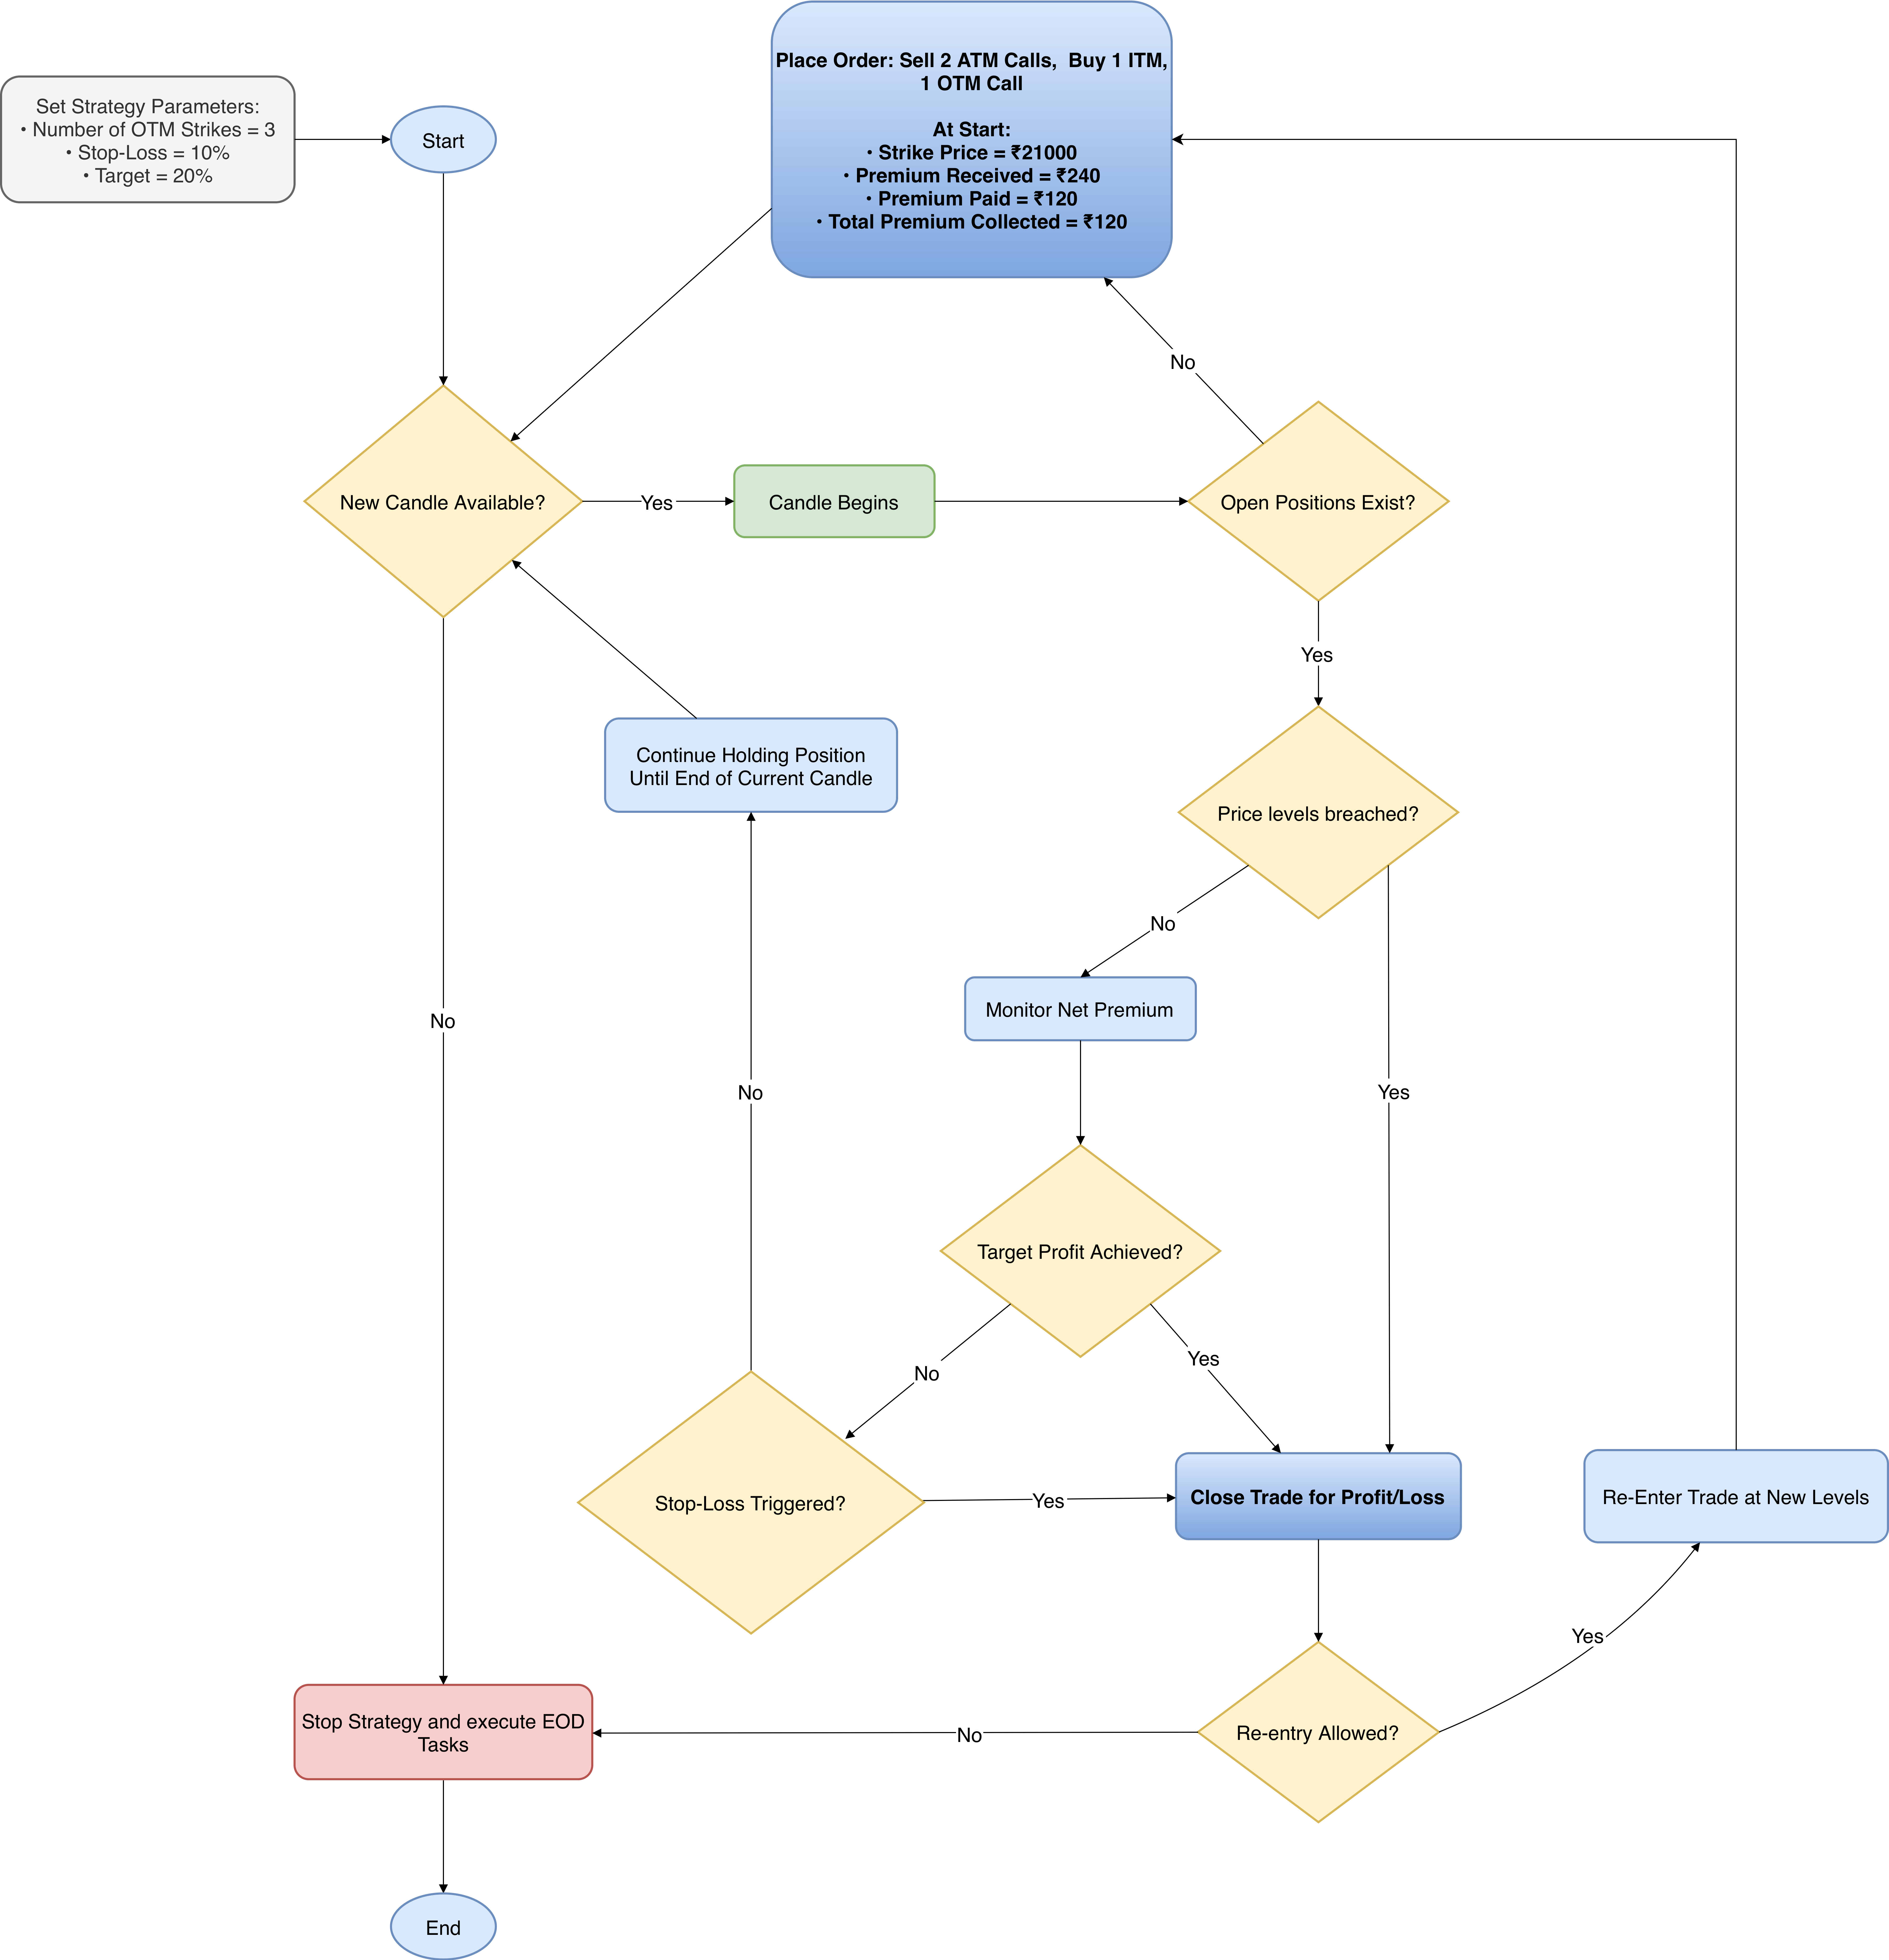 |
|---|
| Figure 1: Short Call Butterfly Strategy Execution Flowchart (Values align with the first sample in the upcoming Profit & Loss Calculations section). |
This section details the Python implementation of a Short Iron Butterfly strategy with fixed strike spacing and automated re-entry logic.
Selecting Instruments and Strikes for Entry
def strategy_select_instruments_for_entry(self, candle, instruments_bucket):
   selected_instruments, meta = [], []

   for base_instrument in instruments_bucket:

       self.logger.info(
           f"Checking entry/re-entry conditions for base instrument: {base_instrument} | "
           f"Determining option instruments and verifying if CE orders are already placed."
       )

       # Define a list of tuples for managing legs, their types, and relevant orders
       leg_wise_list = [
           ("leg_ce_buy_otm", 'CE', OptionsStrikeDirection.OTM.value, self.no_of_otm_strikes_buy_ce_leg, 'BUY',
            self.child_instrument_main_orders[base_instrument].get("leg_ce_buy_otm")),
           ("leg_ce_sell_atm", 'CE', OptionsStrikeDirection.ATM.value, 0, 'SELL',
            self.child_instrument_main_orders[base_instrument].get("leg_ce_sell_atm_one")),
           ("leg_ce_buy_itm", 'CE', OptionsStrikeDirection.ITM.value, self.no_of_itm_strikes_buy_ce_leg, 'BUY',
            self.child_instrument_main_orders[base_instrument].get("leg_ce_buy_itm"))
       ]

       # Initialize re-entry count for this base instrument, else decrement remaining re-entries
       current_underlying_price = self.broker.get_ltp(base_instrument)
       if not self.reentry_left.get(base_instrument):
           self.reentry_left[base_instrument] = self.reentry_limit
       else:
           self.reentry_left[base_instrument] -= 1

       # Proceed only if no open orders or if there are reentries left
       if not self.child_instrument_main_orders.get(base_instrument) and self.reentry_left[base_instrument] > 0:
           for leg, tradingsymbol_suffix, strike_direction, no_of_strikes, action, main_order in leg_wise_list:
               self.options_instruments_set_up_all_expiries(base_instrument, tradingsymbol_suffix, current_underlying_price)
               child_instrument = self.get_child_instrument_details(base_instrument, tradingsymbol_suffix, strike_direction, no_of_strikes)  # Retrieve child base_instrument details for the given base_instrument
               self.instruments_mapper.add_mappings(base_instrument, child_instrument)  # Maps each base_instrument to its child in the instruments' mapper for further processing.
               selected_instruments.append(child_instrument)
               meta.append({"leg": leg, "action": action, "base_instrument": base_instrument})

   return selected_instruments, meta
Code Explanation:
1. leg_wise_list structure
leg_wise_list = [
    ("leg_ce_buy_otm", 'CE', OptionsStrikeDirection.OTM.value, self.no_of_otm_strikes_buy_ce_leg, 'BUY', ...),
    ("leg_ce_sell_atm", 'CE', OptionsStrikeDirection.ATM.value, 0, 'SELL', ...),
    ("leg_ce_buy_itm", 'CE', OptionsStrikeDirection.ITM.value, self.no_of_itm_strikes_buy_ce_leg, 'BUY', ...)
]
-
This list defines all legs of the Short Call Butterfly in a data-driven format instead of writing separate logic for each leg.
-
The key benefit is that strike direction (ITM/ATM/OTM) and strike distance are parameterized, allowing the same loop to dynamically construct all legs without hardcoding strike logic multiple times.
-
This makes the strategy easier to scale or modify (e.g., changing wing width) without rewriting execution logic.
2. Underlying price fetched once per base instrument
Instead of fetching price inside each leg loop, the strategy retrieves the latest underlying price once and reuses it for all legs.
This ensures:
- All legs are calculated using the same price snapshot
- Reduces unnecessary broker/API calls
3. Re-entry counter initialization & decrement logic
- This manages how many times the strategy is allowed to re-enter per base instrument.
Logic flow:
- First time → initialize with reentry_limit
- Every subsequent attempt → decrement counter
Important nuance:
- This decrement happens before checking whether orders are empty, meaning the strategy “consumes” a re-entry attempt even if entry conditions later fail. This acts as a throttle on repeated entry attempts.
4. Entry allowed only when no active position exists
if not self.child_instrument_main_orders.get(base_instrument) and self.reentry_left[base_instrument] > 0:
- Two strict conditions must be satisfied:
-
No open orders for this base instrument
Prevents overlapping butterfly positions. -
Re-entries still available
Ensures the strategy does not keep re-entering endlessly after repeated exits.
- Only when both are true does the strategy attempt a fresh butterfly entry.
5. options_instruments_set_up_all_expiries() inside leg loop
self.options_instruments_set_up_all_expiries(base_instrument, tradingsymbol_suffix, current_underlying_price)
-
Even though this is called for each leg, the internal implementation typically caches expiry setups.
-
This ensures:
- Correct expiry instruments are loaded for CE options
- Strike selection logic has all required option chains available
-
It acts as a safety setup call before strike selection.
6. Strike selection using directional rules
child_instrument = self.get_child_instrument_details(
    base_instrument, tradingsymbol_suffix, strike_direction, no_of_strikes
)
-
This is where the actual option strike is determined.
-
It uses:
- Underlying price
- Direction (ITM / ATM / OTM)
- Distance in strikes
-
This builds the Short Call Butterfly structure programmatically.
7. selected_instruments and meta lists
selected_instruments.append(child_instrument)
meta.append({"leg": leg, "action": action, "base_instrument": base_instrument})
Two outputs are prepared:
-
selected_instruments: Actual instruments to place orders on
-
meta: Context metadata (leg name + action)
This separation allows the execution engine to:
- Place orders
- Know which leg it belongs to
- Track long/short side correctly
Creating an Order for a Position
def strategy_enter_position(self, candle, instrument, meta):
   _order = None
   child_instrument = instrument
   base_instrument = self.instruments_mapper.get_base_instrument(child_instrument)
   ltp_current = self.broker.get_ltp(child_instrument)
   quantity = self.number_of_lots * child_instrument.lot_size if meta['leg'] != "leg_ce_sell_atm" else 2 * child_instrument.lot_size * self.number_of_lots
   _order = self.broker.OrderRegular(
       child_instrument, meta['action'], order_code=self.order_code, order_variety=BrokerOrderVarietyConstants.LIMIT, position=BrokerExistingOrderPositionConstants.ENTER, price=ltp_current, quantity=quantity
   )
   if check_order_placed_successfully(_order) and check_order_complete_status(_order):
       self.base_instrument_price_at_entry[base_instrument] = self.broker.get_ltp(base_instrument)  # Initializes base reference price with trade entry price; updated only after each exit.
       self.child_instrument_main_orders[base_instrument][meta['leg']] = _order
   else:
       # Protection logic incase any of the legs fail to get placed - this will help avoid having naked positions
       self.logger.critical('Order placement failed for one of the legs. Exiting position for other legs...')
       self.exit_all_positions_for_base_instrument(base_instrument)
   return _order
Code Explanation:
1. Quantity logic for the ATM short leg
quantity = self.number_of_lots * child_instrument.lot_size \
    if meta['leg'] != "leg_ce_sell_atm" \
    else 2 * child_instrument.lot_size * self.number_of_lots
-
The ATM short call leg is sold in double quantity compared to the wing legs.
-
This is what forms the butterfly payoff structure.
-
Without doubling the middle strike, the structure would become a spread instead of a butterfly.
2. Limit order at current LTP
_order = self.broker.OrderRegular(
    child_instrument,
    meta['action'],
    order_code=self.order_code,
    order_variety=BrokerOrderVarietyConstants.LIMIT,
    position=BrokerExistingOrderPositionConstants.ENTER,
    price=ltp_current,
    quantity=quantity
)
-
Orders are placed as LIMIT orders at the current LTP, not market orders.
-
This gives:
-
Better execution control
-
Reduced slippage risk
-
More predictable entry pricing across all legs
-
-
This is especially important in multi-leg strategies where fill imbalance can create temporary risk.
3. Base instrument entry price tracking
-
The strategy stores the underlying price at the time of entry.
-
This value is later used for:
- Price breach exit logic
- Re-entry calculations
- Measuring how far price has moved relative to the original structure
-
It acts as the reference anchor for all future price-based decisions.
4. Leg-wise order tracking
-
Each successfully placed order is stored using:
-
The base instrument (e.g., NIFTY)
-
The specific leg name (e.g., leg_ce_buy_itm)
-
-
This structure allows the strategy to:
-
Monitor each leg individually
-
Exit legs precisely
-
Detect whether the full structure is open or partially filled
-
5. Fail-safe protection against naked positions
self.logger.critical('Order placement failed for one of the legs. Exiting position for other legs...')
self.exit_all_positions_for_base_instrument(base_instrument)
-
If any leg fails to place or complete, the strategy immediately exits all already-placed legs.
-
This prevents:
-
Partial butterfly structures
-
Unhedged short call exposure
-
Directional naked risk
-
-
It ensures the strategy remains strictly defined-risk at all times.
Exit Condition Checks
def check_exit_condition(self, base_instrument):
   """ Determines if the strategy should exit based on price breach conditions. Returns True if exit condition is met. """
   ott_multiplier = {BrokerOrderTransactionTypeConstants.BUY: 1, BrokerOrderTransactionTypeConstants.SELL: -1}
   exit_triggered = False

   # Price level breach check
   current_underlying_price = self.broker.get_ltp(base_instrument)
   flag_upper_breach_possible_reentry = current_underlying_price - self.base_instrument_price_at_entry.get(base_instrument) >= self.price_breach_upper_offset if self.price_breach_upper_offset else False
   flag_lower_breach_possible_reentry = current_underlying_price - self.base_instrument_price_at_entry.get(base_instrument) <= - self.price_breach_lower_offset if self.price_breach_lower_offset else False

   if flag_upper_breach_possible_reentry or flag_lower_breach_possible_reentry:
       breach_type_str = 'Upper' if self.flag_upper_breach_possible[base_instrument] else 'Lower'
       self.logger.info(f'{breach_type_str} price thresholds breached. Exiting current positions for all legs. Checking reentry condition in next candle...')
       exit_triggered = True

   # Target/Stoploss Check
   current_net_premium = sum([ott_multiplier[order.order_transaction_type] * self.broker.get_ltp(order.instrument) for order in self.child_instrument_main_orders[base_instrument].values()])
   if not self.entry_net_premium.get(base_instrument):
       self.entry_net_premium[base_instrument] = sum(
           ott_multiplier[order.order_transaction_type] * order.entry_price for order in self.child_instrument_main_orders[base_instrument].values()) if not self.entry_net_premium else self.entry_net_premium
       self.stoploss_premium[base_instrument] = self.entry_net_premium[base_instrument] * (1 + self.stoploss_percentage / 100)
       self.target_premium[base_instrument] = self.entry_net_premium[base_instrument] * (1 - self.target_percentage / 100)

   self.logger.debug(f"For {base_instrument}: "
                     f"Net Entry Premium: {self.entry_net_premium[base_instrument]} | Current Net Premium: {current_net_premium} | Stoploss Threshold: {self.stoploss_premium[base_instrument]:.2f} | Target Threshold: {self.target_premium[base_instrument]:.2f}")

   target_profit_condition = current_net_premium < self.target_premium[base_instrument]
   if target_profit_condition:
       self.logger.debug(f"For {base_instrument}: Target profit reached - Current Net Premium ({current_net_premium}) dropped below Target Threshold ({self.target_premium[base_instrument]:.2f}). Exiting position...")
       exit_triggered = True

   stop_loss_condition = current_net_premium > self.stoploss_premium[base_instrument]
   if stop_loss_condition:
       self.logger.debug(f"For {base_instrument}: Stoploss triggered - Current Net Premium ({current_net_premium}) exceeded Stoploss Threshold ({self.stoploss_premium[base_instrument]:.2f}). Exiting position...")
       exit_triggered = True

   if exit_triggered:
       self.base_instrument_price_at_entry[base_instrument] = current_underlying_price  # Current ltp becomes new base reference price in case of breach
       return True

   return False
Code Explanation:
1. ott_multiplier – Converting BUY/SELL into signed premium
ott_multiplier = {
    BrokerOrderTransactionTypeConstants.BUY: 1,
    BrokerOrderTransactionTypeConstants.SELL: -1
}
-
This converts each leg into signed premium impact:
-
BUY option: + premium (you paid)
-
SELL option: – premium (you received)
-
-
So when summing premiums:
-
Net credit strategy → entry_net_premium becomes negative
-
Net debit strategy → entry_net_premium becomes positive
-
-
This sign handling allows a single formula to work for both profit and stop-loss logic.
2. Price breach exit logic (structure-based exit)
flag_upper_breach_possible_reentry =
    current_underlying_price - entry_price >= upper_offset

flag_lower_breach_possible_reentry =
    current_underlying_price - entry_price <= -lower_offset
-
This checks if the underlying has moved too far from the entry reference.
-
Instead of monitoring option premiums, this is a structure integrity check:
-
If price moves too far → butterfly shape no longer valid
-
Strategy exits before losses accelerate
-
-
This is independent of P&L - it’s a market structure safeguard.
3. Real-time net premium calculation
current_net_premium = sum(
    ott_multiplier[order.order_transaction_type] *
    self.broker.get_ltp(order.instrument)
    for order in self.child_instrument_main_orders[base_instrument].values()
)
-
This gives the live mark-to-market value of the entire butterfly.
-
Because of the sign convention:
-
Profit happens when net premium decreases (you can buy back cheaper)
-
Loss happens when net premium increases
-
-
This is why target and stop-loss use opposite comparisons.
4. Entry premium initialization (only once per cycle)
if not self.entry_net_premium.get(base_instrument):
    self.entry_net_premium[base_instrument] = ...
-
The entry premium is stored only the first time after a new position is built.
-
This ensures:
-
Stop-loss and target are anchored to original entry
-
Re-entry creates a fresh premium baseline
-
-
Without this, thresholds would keep drifting.
5. Stop-loss and target threshold construction
-
Because this is a net credit structure, you profit when the total premium of the position falls after entry, because you can buy it back cheaper than you sold it. You incur a loss when the premium rises, because closing the position now costs more than the credit you received.
-
So:
-
Target = lower premium than entry
-
Stop-loss = higher premium than entry
-
-
That’s why the comparisons later may feel inverted.
6. Updating base price after exit
-
After an exit (especially price breach), the new market price becomes the reference.
-
This is crucial for:
-
Correct re-entry offsets
-
Preventing repeated exits at the same level
-
Ensuring each cycle is based on fresh structure context
-
Validation in Short Call Butterfly
def validate_parameters(self):

   # Validate parameters
   for param in (self.price_breach_upper_offset, self.price_breach_lower_offset, self.target_percentage, self.stoploss_percentage):
       check_argument(param, "extern_function", is_nonnegative_int_or_float, "Parameter should be a non-negative number (>= 0.0)")

   for param in (self.no_of_otm_strikes_buy_ce_leg, self.no_of_itm_strikes_buy_ce_leg):
       check_argument(param, "extern_function", is_positive_int, "NUMBER_OF_*_STRIKES_CALL_LEG parameters should be positive integers (> 0)")

   for param in (self.strategy_parameters.get("ALLOW_UPPER_PRICE_BREACH", 0), self.strategy_parameters.get("ALLOW_LOWER_PRICE_BREACH", 0)):
       check_argument(param, "extern_function", lambda x: isinstance(x, int) and x in [0, 1], f"ALLOW_*_PRICE_BREACH flags should be either 0 (False) or 1 (True)")

   check_argument(self.reentry_limit, "extern_function", is_nonnegative_int, "REENTRY_LIMIT should be a non-negative integer (>= 0)")
Code Explanation:
The validate_parameters function ensures all strategy inputs are logically valid before any trading logic runs.
Failure Case 1: Invalid price offsets or percentage values
self.price_breach_upper_offset = -10
self.price_breach_lower_offset = 5
self.target_percentage = -20
self.stoploss_percentage = "ten"

validate_parameters()
Error:
Parameter should be a non-negative number (>= 0.0)
Reason:
The following must be numeric and ≥ 0:
- price_breach_upper_offset
- price_breach_lower_offset
- target_percentage
- stoploss_percentage
Negative values or non-numeric types break risk logic and are rejected.
Failure Case 2: Invalid strike distance configuration
self.no_of_otm_strikes_buy_ce_leg = 0
self.no_of_itm_strikes_buy_ce_leg = -2

validate_parameters()
Error:
NUMBER_OF_*_STRIKES_CALL_LEG parameters should be positive integers (> 0)
Reason:
Strike distance values must be strictly positive integers.
Zero or negative values would make strike selection invalid.
Failure Case 3: Invalid breach enable/disable flags
self.strategy_parameters["ALLOW_UPPER_PRICE_BREACH"] = 2
self.strategy_parameters["ALLOW_LOWER_PRICE_BREACH"] = "yes"

validate_parameters()
Error:
ALLOW_*_PRICE_BREACH flags should be either 0 (False) or 1 (True)
Reason:
These are binary control flags, not general numbers.
Only:
- 0 → Disabled
- 1 → Enabled
Any other value breaks the strategy’s conditional flow.
Failure Case 4: Invalid re-entry limit
self.reentry_limit = -1

validate_parameters()
Error:
REENTRY_LIMIT should be a non-negative integer (>= 0)
Reason:
Re-entry count cannot be negative.
0 means no re-entries allowed; positive values define how many times re-entry is permitted.
💡 Want to see the complete strategy? Check out the full implementation here.
Ideal Market Conditions for Short Call Butterfly
When to Use
The Short Call Butterfly works best when a moderate price move is expected, allowing the underlying to move away from the central strike while staying within a defined range.
Typical scenarios include:
-
Post-Consolidation Breakouts: After a prolonged period of consolidation, when the market is expected to make a directional move but lacks strong momentum for a runaway trend.
-
Event-Driven Volatility Expansion: Around events such as earnings releases, economic data announcements, or policy decisions, where volatility is expected to increase but price movement is anticipated to stay controlled.
-
Trend Initiation Phases: Early stages of a new trend where directional bias exists, but large impulsive moves are still uncertain.
-
Moderate Volatility Environments: Markets transitioning from low to moderate implied volatility, where expansion in volatility supports movement away from the middle strike without extreme price swings.
Interpreting the Short Call Butterfly Payoff Structure
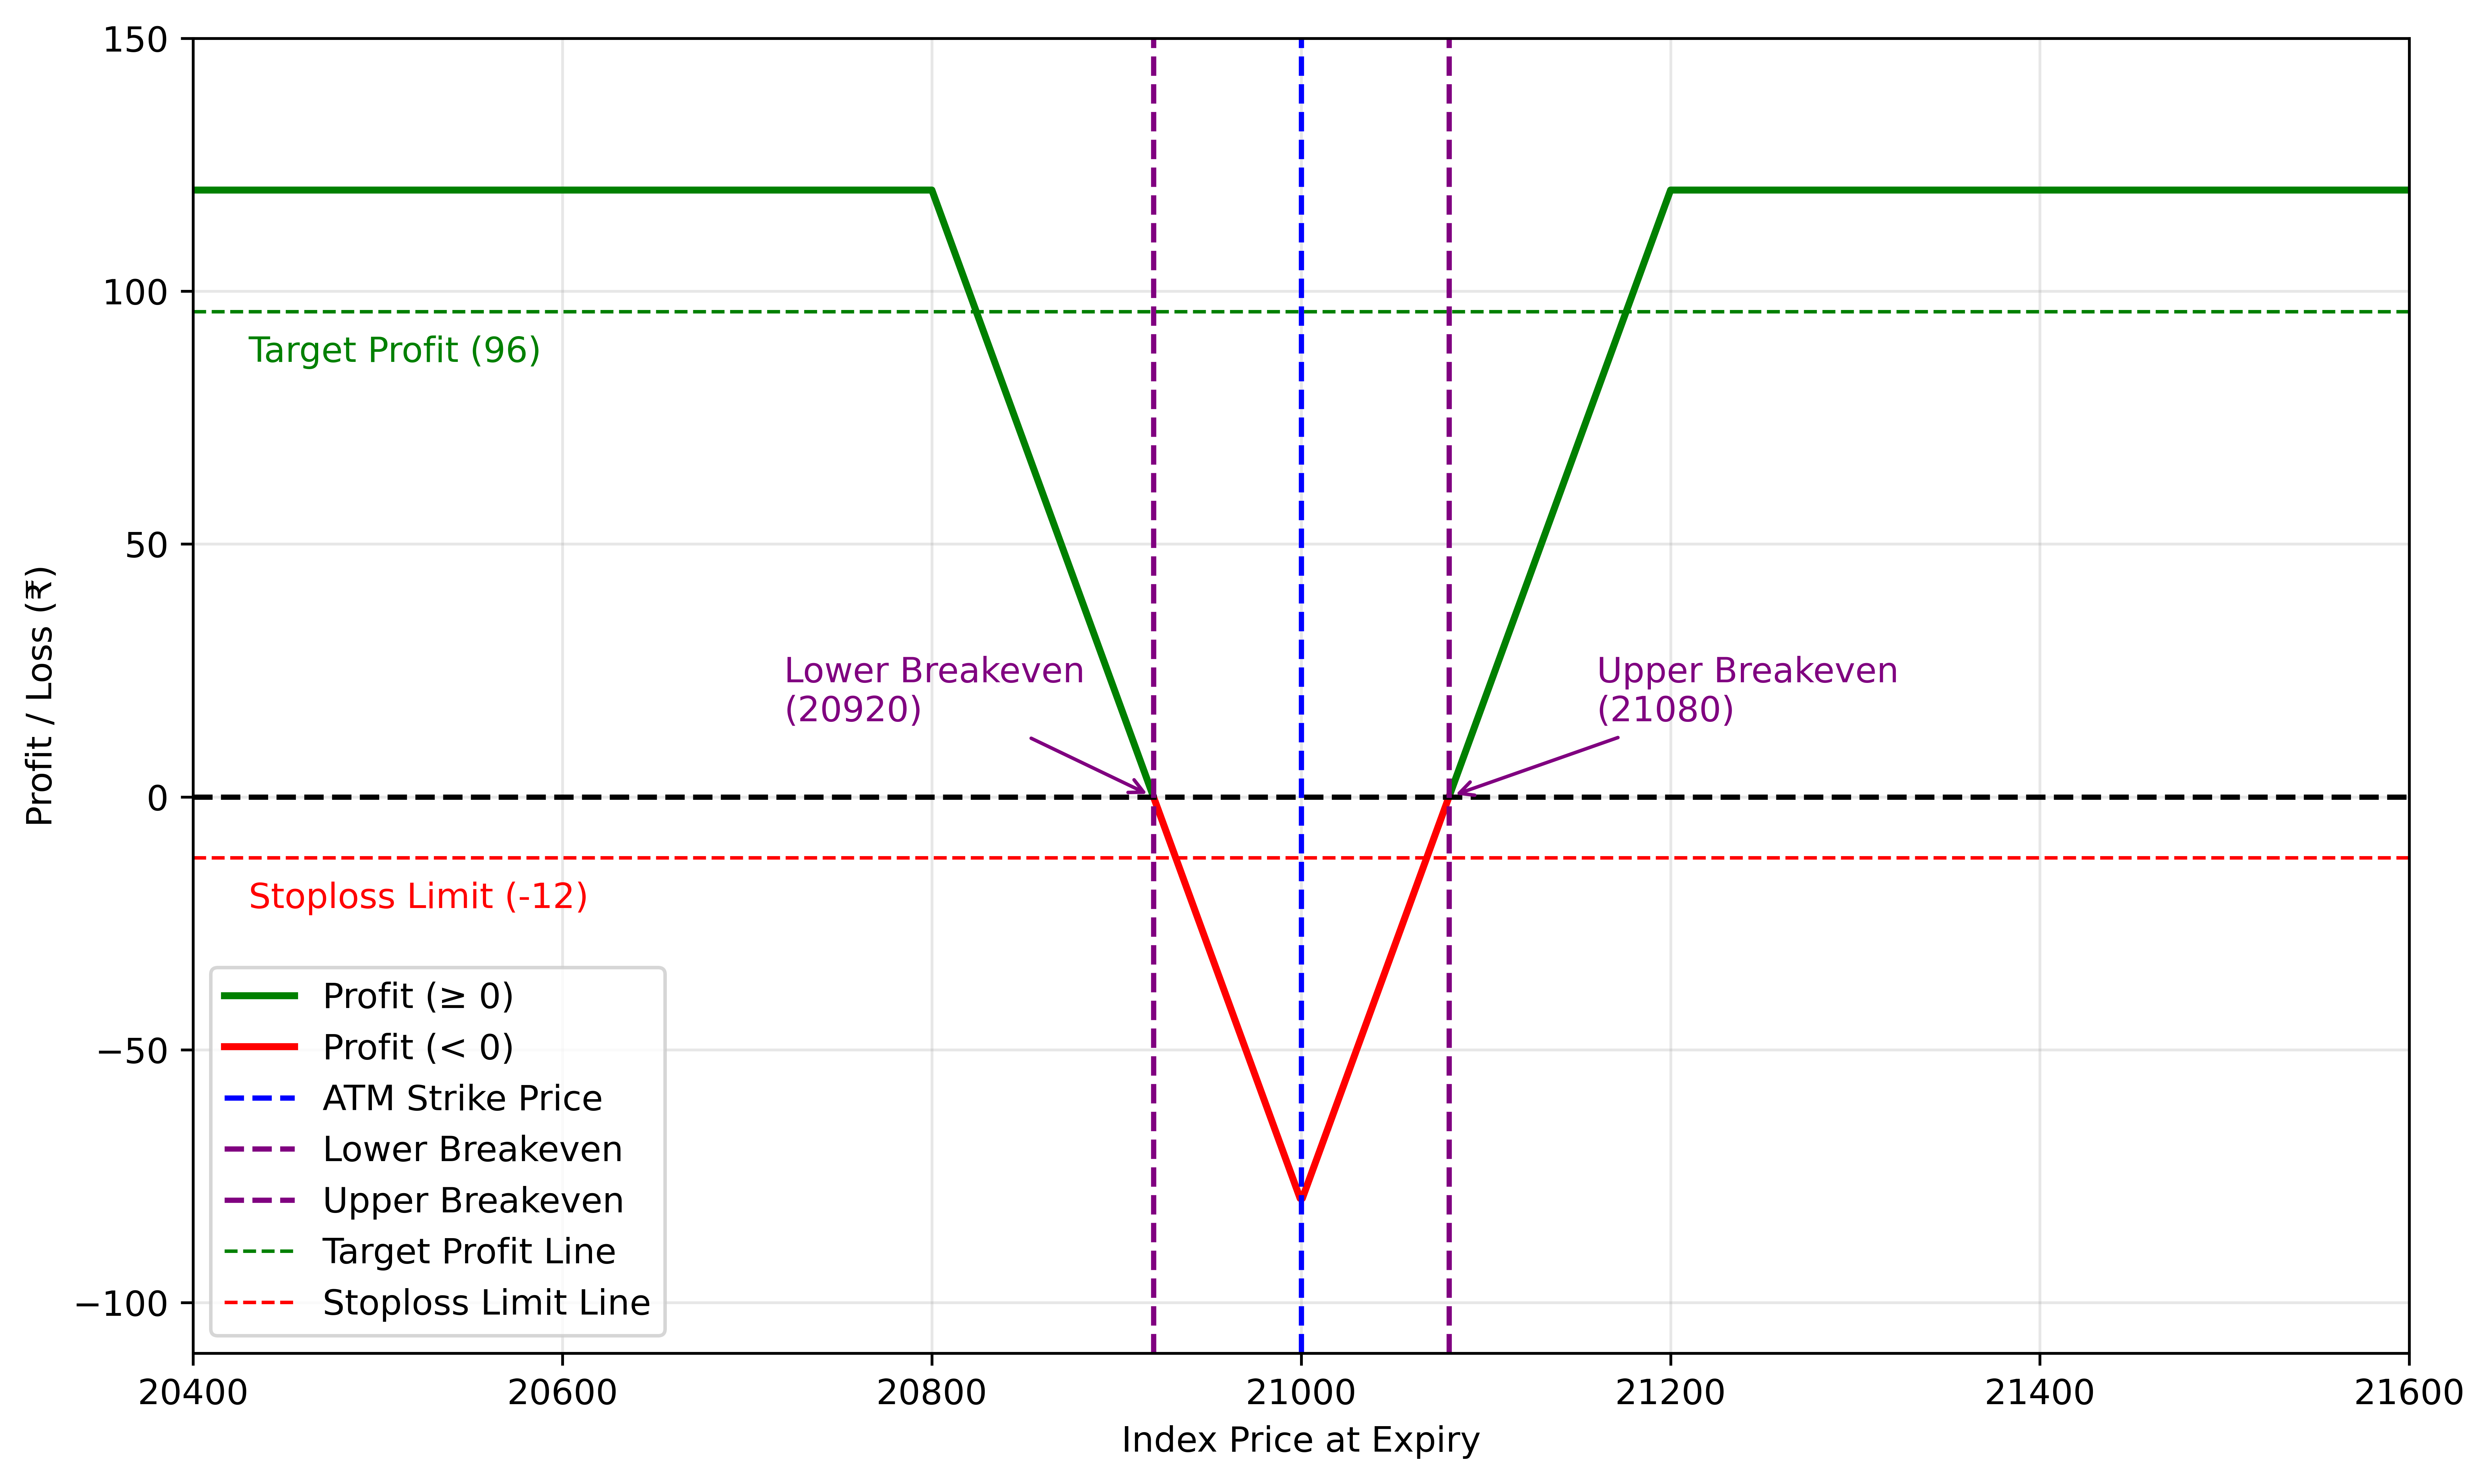
The following payoff diagram illustrates the profit and loss dynamics of a short iron butterfly strategy. The values used correspond to those depicted in the flowchart.
 |
|---|
| Figure 2: Profit and Loss Diagram |
The green curve represents the profit region of the strategy. In a Short Call Butterfly, profits are realised when the underlying price moves away from the central at-the-money (ATM) strike but remains within a controlled range defined by the outer call strikes. Unlike neutral premium-selling strategies, this setup benefits from moderate directional movement rather than complete price stagnation.
The maximum profit is capped and occurs when the underlying price approaches either of the long call wings, allowing the trader to retain the full net credit collected at entry. The dotted green line indicates the target profit level, where the strategy is typically exited to lock in gains.
The red curve highlights the loss zone, which is concentrated around the ATM strike. Losses peak when the underlying expires close to the sold ATM calls, where option decay is least favourable for the position. However, the downside is strictly limited, as indicated by the red dashed stop-loss line, ensuring controlled risk.
Key dashed markers denote critical price levels:
-
Breakeven points indicate where the payoff curve crosses zero, separating profit and loss regions.
-
ATM strike price marks the point of maximum risk concentration.
-
Target profit and stop-loss thresholds define the active risk management boundaries applied during execution.
Profit and Loss Calculations for Low and High Risk Versions
1. Low-Risk Short Call Butterfly
The following example illustrates a low-risk Short Call Butterfly constructed on FINNIFTY, designed to benefit from a controlled price move away from the central strike while maintaining defined risk.
Key Parameters
-
Target Profit (target_percentage): 20% of the net credit
-
Stop-Loss (stoploss_percentage): 10% of the net credit
-
Instrument: FINNIFTY Index
-
Expiration Type: Nearest Monthly Expiry
-
Strike Selection:
-
Leg One: 3 strikes below ATM (ITM Call Buy) - 20,800
-
Leg Two: ATM Strike (Call Sell - Quantity 2) - 21,000
-
Leg Three: 3 strikes above ATM (OTM Call Buy) - 21,200
-
-
Re-entry Levels:
-
Lower Re-Entry Level: 20,900
-
Upper Re-Entry Level: 21,100
-
Calculations
(Assume a simple 1:1 relationship between the FINNIFTY underlying and the spread for illustration.)
-
Total Premium Collected: ₹120 (ATM Call) + ₹120 (ATM Call) = ₹240
-
Total Premium Paid: ₹80 (ITM Call) + ₹40 (OTM Call) = ₹120
-
Net Premium Received = ₹240 – ₹120 = ₹120
-
Target Profit (0.2 × Total Premium Received):
₹120 × 0.20 = ₹24
Exit when spread reaches +₹24 profit.
-
Stop-Loss (0.1 × Total Premium Received):
₹120 × 0.10 = ₹12
Max possible loss capped at ₹12.
-
Maximum Profit Calculation:
Maximum Profit = Net Premium Received = ₹120
Occurs when the underlying expires away from the ATM strike and closer to either wing. -
Maximum Loss Calculation:
Maximum Loss = Strike Difference – Net Premium Received = ₹200 – ₹120 = ₹80
Occurs if the underlying expires exactly at the ATM strike, where the short calls are concentrated.
-
Breakeven Points:
-
Lower Breakeven: ATM − Net Premium = 21,000 − 120 = 20,880
-
Upper Breakeven: ATM + Net Premium = 21,000 + 120 = 21,120
-
| Spot Price | P&L With Target/Stop-loss | P&L Without Target/Stop-loss |
|---|---|---|
| 21,000 | Exit at ₹132 = –₹12 (Capped) | –₹120 (Maximum Loss) |
| 21,120 | Exit at ₹120 = ₹0 | ₹0 |
| 21,144 | Exit at ₹96 = +₹24 (Target Profit) | ₹24 |
| 21,200 | Exit at ₹96 = +₹24 (Target Profit) | ₹120 |
2. High-Risk Short Call Butterfly
The following diagram represents the payoff behaviour of a high-risk Short Call Butterfly position at expiry.
 |
|---|
| Figure 3: Profit and Loss Diagram - High Risk Version |
The following example illustrates a high-risk Short Call Butterfly constructed on TSLA (Tesla Inc.), designed to capitalize on sharp but controlled price movement while still maintaining defined risk boundaries.
This setup is suitable for high-volatility environments, where larger intraday or short-term moves are expected.
Key Parameters
Target Profit (target_percentage): 30% of the net credit
Stop-Loss (stoploss_percentage): 20% of the net credit
Instrument: TSLA (Tesla Inc.)
Expiration Type: Nearest Weekly Expiry
Strike Selection:
-
Leg One: 1 strike below ATM (ITM Call Buy) - $245
-
Leg Two: ATM Strike (Call Sell – Quantity 2) - $250
-
Leg Three: 1 strike above ATM (OTM Call Buy) - $255
Re-Entry Levels:
-
Lower Re-Entry Level: $248
-
Upper Re-Entry Level: $252
Calculations
(Assume a 1:1 relationship between the TSLA spot price and the option spread for illustration.)
-
Total Premium Collected: $9 (ATM Call) + $9 (ATM Call) = $18
-
Total Premium Paid: $12 (ITM Call) + $3 (OTM Call) = $15
-
Net Premium Received: $18 − $15 = $3
-
Target Profit (30% of Net Credit):
$3 × 0.30 = $0.9
Exit when spread reaches +$0.9 profit
-
Stop-Loss (20% of Net Credit):
$3 × 0.20 = $0.6Maximum loss capped at −$0.6
-
Maximum Profit Calculation:
Maximum Profit = Net Premium Received = $3
Occurs when TSLA expires away from the ATM strike, closer to either wing ($245 or $255), allowing both short calls to decay.
- Maximum Loss Calculation
Maximum Loss = Strike Width − Net Premium Received = $5 − $3 = $2
-
Breakeven Points
-
Lower Breakeven: ATM − Net Premium = $250 − $3 = $247
-
Upper Breakeven: ATM + Net Premium = $250 + $3 = $253
-
| Spot Price | P&L With Target/Stop-loss | P&L Without Target/Stop-loss |
|---|---|---|
| $250 | Exit at $3.6 = –$0.6 (Capped) | –$2 (Maximum Loss) |
| $253 | Exit at $3 = ₹0 | $0 |
| $253.9 | Exit at $2.1 = +$0.9 (Target Profit) | $0.9 |
| $255 | Exit at $2.1 = +$0.9 (Target Profit) | $3 |
The low-risk version targets steady returns with smaller premiums but lower probability of large losses, due to its compact breakeven zone.
In contrast, a High-Risk Short Call Butterfly Strategy aims to collect a higher premium by taking on more exposure, this increases the potential return but also raises the chances of loss, especially if the underlying price moves sharply outside the breakeven levels.
Let’s understand the difference more clearly using a visual comparison.
Comparing Short Call Butterfly and Long Iron Butterfly Strategies
Both the Short Call Butterfly and the Long Iron Butterfly are multi-leg options strategies that produce a distinct inverted-V shaped payoff at expiry. While their payoff diagrams appear similar at first glance, the two strategies are constructed with very different objectives, market assumptions, and risk profiles.
The Short Call Butterfly is designed to benefit from moderate directional movement away from the center strike, whereas the Long Iron Butterfly is structured to profit from a sharp move in either direction, typically during high-volatility events.
| Feature | Short Call Butterfly | Long Iron Butterfly |
|---|---|---|
| Option Types Used | 1 ITM Call Buy, 2 ATM Call Sell, 1 OTM Call Buy | 1 Long ATM Call, 1 Long ATM Put, 1 Short OTM Call, 1 Short OTM Put |
| Strategy Bias | Mildly directional (expects movement away from ATM) | Non-directional but volatility-driven |
| Initial Trade Type | Credit (Net premium received) | Debit (Net premium paid) |
| Payoff Shape | Inverted V | Inverted V |
| Max Profit Scenario | Underlying moves away from ATM toward either call wing | Underlying makes a strong move in either direction |
| Max Loss Scenario | Underlying expires near the ATM strike | Underlying remains near ATM strike |
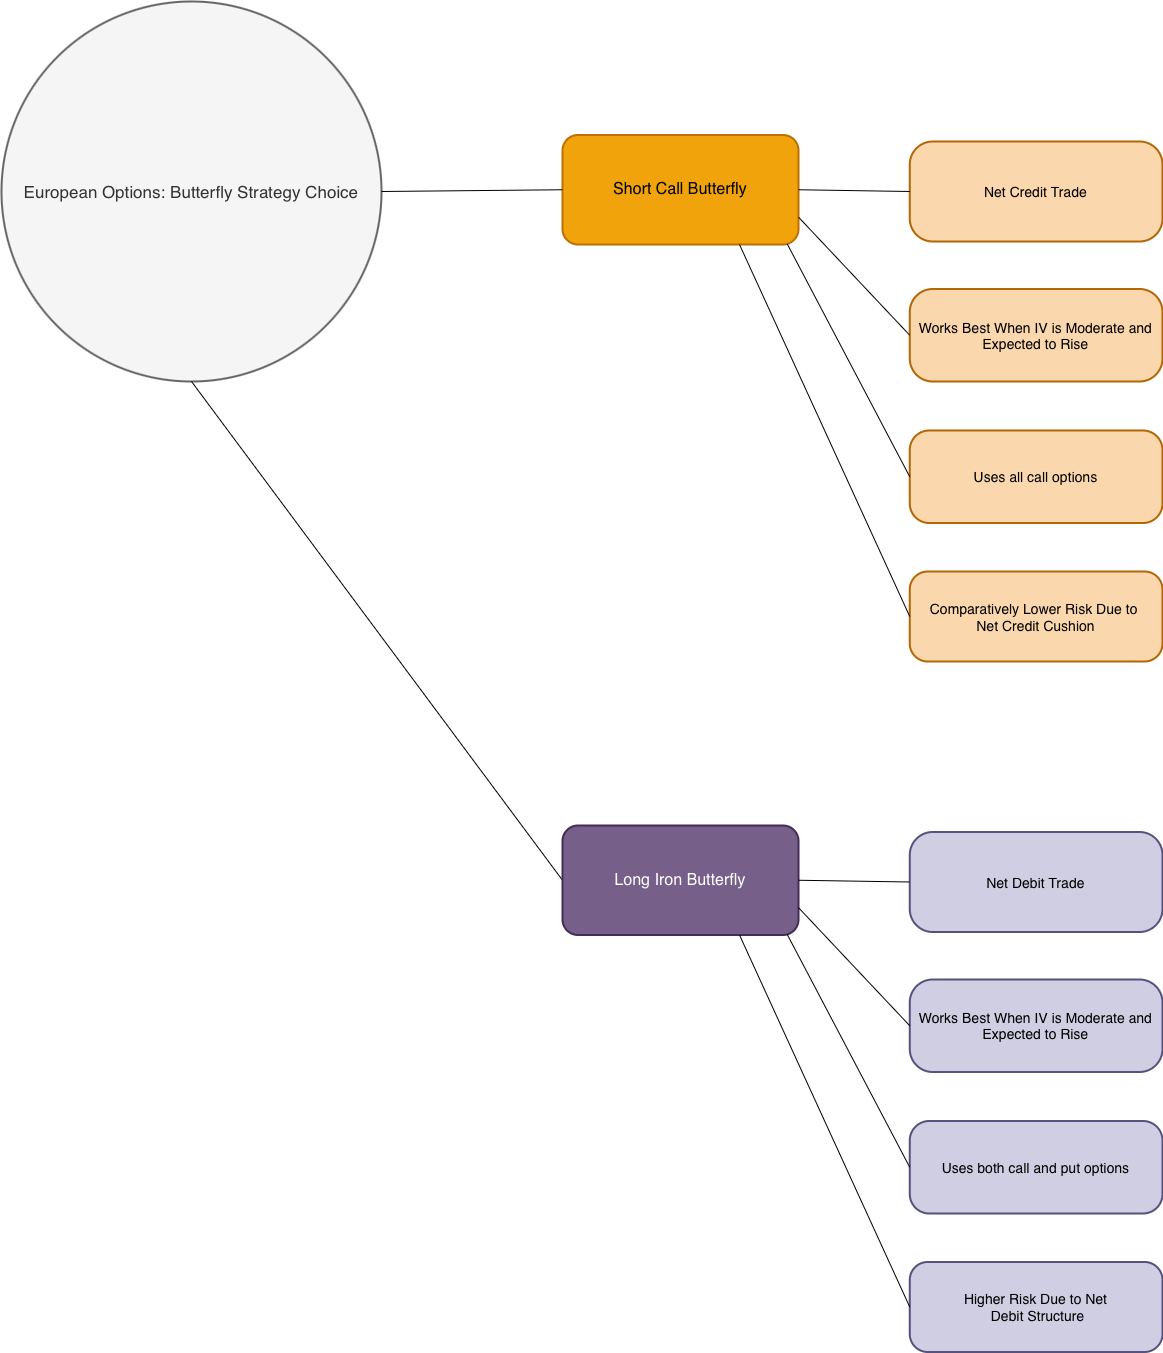 |
|---|
| Figure 4: Short Call Butterfly vs. Long Iron Butterfly Mind Tree |
Which One Is Right for You?
If you expect a controlled price move away from the central strike and prefer a credit-based strategy with defined risk, the Short Call Butterfly may be more suitable. You receive premium upfront and aim to profit as the price moves away from the middle strike, while risk remains capped by the long call wings.
If you anticipate a stronger price move and are comfortable paying a defined upfront debit, the Long Iron Butterfly can be a better fit. This strategy benefits from significant movement in either direction, with losses limited to the premium paid.
Both strategies offer defined risk and a V-shaped payoff profile, but they differ in execution style. Choose the Short Call Butterfly if you prefer premium collection with controlled movement, or the Long Iron Butterfly if you are positioning for a larger move with limited downside.
Customize the Strategy with Your Own Parameters!
Traders can fine-tune strike selection, expiry choice, stop-loss levels, and profit targets based on risk tolerance.
👉 For testing on the Phoenix platform of AlgoBulls, head over to our site now!
👉 A Jupyter notebook for this strategy is coming soon. Meanwhile, check out All Available Notebooks for Testing Custom Strategies!
Final Thoughts
The Short Iron Butterfly is not a static trade. It’s a defined-risk strategy that rewards consistency in stable markets, with flexibility for re-entry and adjustments.
The Short Call Butterfly is most effective when combined with structured exits and clear price-based controls. By integrating predefined profit and loss thresholds, price-level breach exits, and disciplined re-entry logic, the strategy actively manages risk while capitalizing on controlled price movement away from the central strike.
Rather than relying on expiry outcomes, the strategy emphasizes rule-based exits to respond promptly to unfavorable price behavior or achieved objectives.
Key Risk-Mitigation Techniques
✔ Incorporated in the Strategy
Target profit & hard stop-loss:
The strategy exits automatically once the spread reaches predefined profit or loss thresholds. This ensures consistent execution, locks in gains during favorable moves, and caps downside risk when the trade moves against expectations.
Price-level breach exit:
In addition to P&L-based exits, the strategy monitors predefined upper and lower underlying price thresholds. If the underlying breaches these levels, the position is exited immediately, even if the target or stop-loss has not yet been reached. This protects the strategy from adverse price acceleration or loss of structural edge.
Re-entry logic:
If a position exits due to a target hit, stop-loss, or price-level breach, and the underlying continues to move beyond the defined thresholds, the strategy can re-enter using an updated ATM reference. This allows continued participation in sustained directional moves while maintaining controlled exposure.
✔ Additional Enhancements
High-frequency P&L tracking:
Monitoring profit and loss at a finer interval than the primary candle timeframe (for example, frequent checks within a 1-minute setup) enables quicker exits when price behavior deteriorates near breakeven zones
Position refinement:
Strike distances, spread width, and lot sizing can be adjusted based on volatility or momentum. In higher-volatility conditions, wider wings help accommodate larger price swings while preserving defined risk. Strike selection can also be automated using implied volatility or other market signals to dynamically adapt the strategy.