


Want exposure to steady market climbs with defined risk? The Bull Call Spread is a straightforward debit strategy that keeps costs contained while seeking moderate upside. By pairing a long call with a short call, it creates a net-debit trade with capped gain and capped loss. With target profit, hard stop-loss, trailing stop-loss, and re-entry, it stays disciplined through volatility.
This blog explains the Bull Call Spread’s mechanics, entry and exit rules, and how built-in targets and stop-loss features adapt to changing markets.
Understanding the Bull Call Spread Strategy
The Bull Call Spread is a moderately bullish, two-leg options strategy designed for markets expected to rise gradually. It captures upside gains while reducing the upfront cost of a single long call. The structure is as follows:
- Buy an At-the-Money (ATM) Call Option
- Sell an Out-of-the-Money (OTM) Call Option (Higher Strike)
This creates a net debit trade because the premium paid for the long call is partly offset by the premium received from the short call. The short OTM leg caps the maximum profit but lowers the total premium outlay, providing a defined risk profile.
Strategy Variations
-
Basic Bull Call Spread: Buy low strike call, sell higher strike call, no re-entry, no trailing stop.
-
Enhanced Bull Call Spread (Our Focus): Same core structure but adds automated exits and re-entry for layered risk control.
Compared with buying a naked call, this approach lowers upfront cost, limits time-decay impact, and enforces disciplined exits through defined profit and loss boundaries.
How the Bull Call Spread Strategy Works
1. Entry Criteria
Eligible Market: The Bull Call Spread performs best when the underlying is expected to rise steadily but not explode upward. Indices such as NIFTY 50, BANK NIFTY, S&P 500, or Nasdaq 100 and large-/mid-cap stocks with a clear bullish bias (e.g., AAPL, MSFT, RELIANCE, TCS) are suitable.
Strike Price Selection: This spread can be customized by choosing any two call strikes where the long strike is lower than the short strike, as long as both share the same expiry.
The standard approach, however, is to buy an ATM Call and sell an OTM Call.
-
Narrow Strike Gap: Lowers cost but also limits maximum profit - ideal when only a mild upward move is expected.
-
Wider Strike Gap: Increases potential reward but requires a higher debit and carries slightly more directional risk.
Expiry Selection: Choice of expiry shapes both time decay and cost:
-
Weekly Expiry: Best for short-term directional moves; captures quick momentum.
-
Monthly Expiry: Allows more time for a gradual uptrend and smoother profit realization.
Lot Size & Positioning: Size positions so that the net debit paid represents an acceptable maximum loss. Use a consistent percentage of trading capital per spread to manage exposure.
Timeframes: It can be implemented on any 1–60 minute chart for intraday setups, with 1- or 5-minute charts offering the most precise entries and exits.
2. Exit Rules & Re-Entry Strategy
The Bull Call Spread follows a structured exit and re-entry framework to control risk and protect gains.
The strategy exits when:
-
Target Profit reached: Close the spread once the net premium hits a predefined profit level to lock in gains.
-
Hard Stop-Loss triggered: Exit if the spread’s value falls to a set percentage of the initial debit, capping the maximum loss.
-
Trailing Stop triggered: A trailing stop on the net spread premium ratchets higher as the spread gains value. A pullback of the set trailing percentage triggers an exit to preserve profits.
Re-Entry Logic
If the position exits via target, hard stop-loss, or trailing stop, and the underlying resumes its uptrend, the strategy can open a new Bull Call Spread at the latest at-the-money strike. A fresh reference price and trailing stop are then applied to the re-entered trade.
Time-Based Exit
A time-based exit can be used to close the position after a chosen portion of the expiry period common when most extrinsic value has decayed and further gains are unlikely.
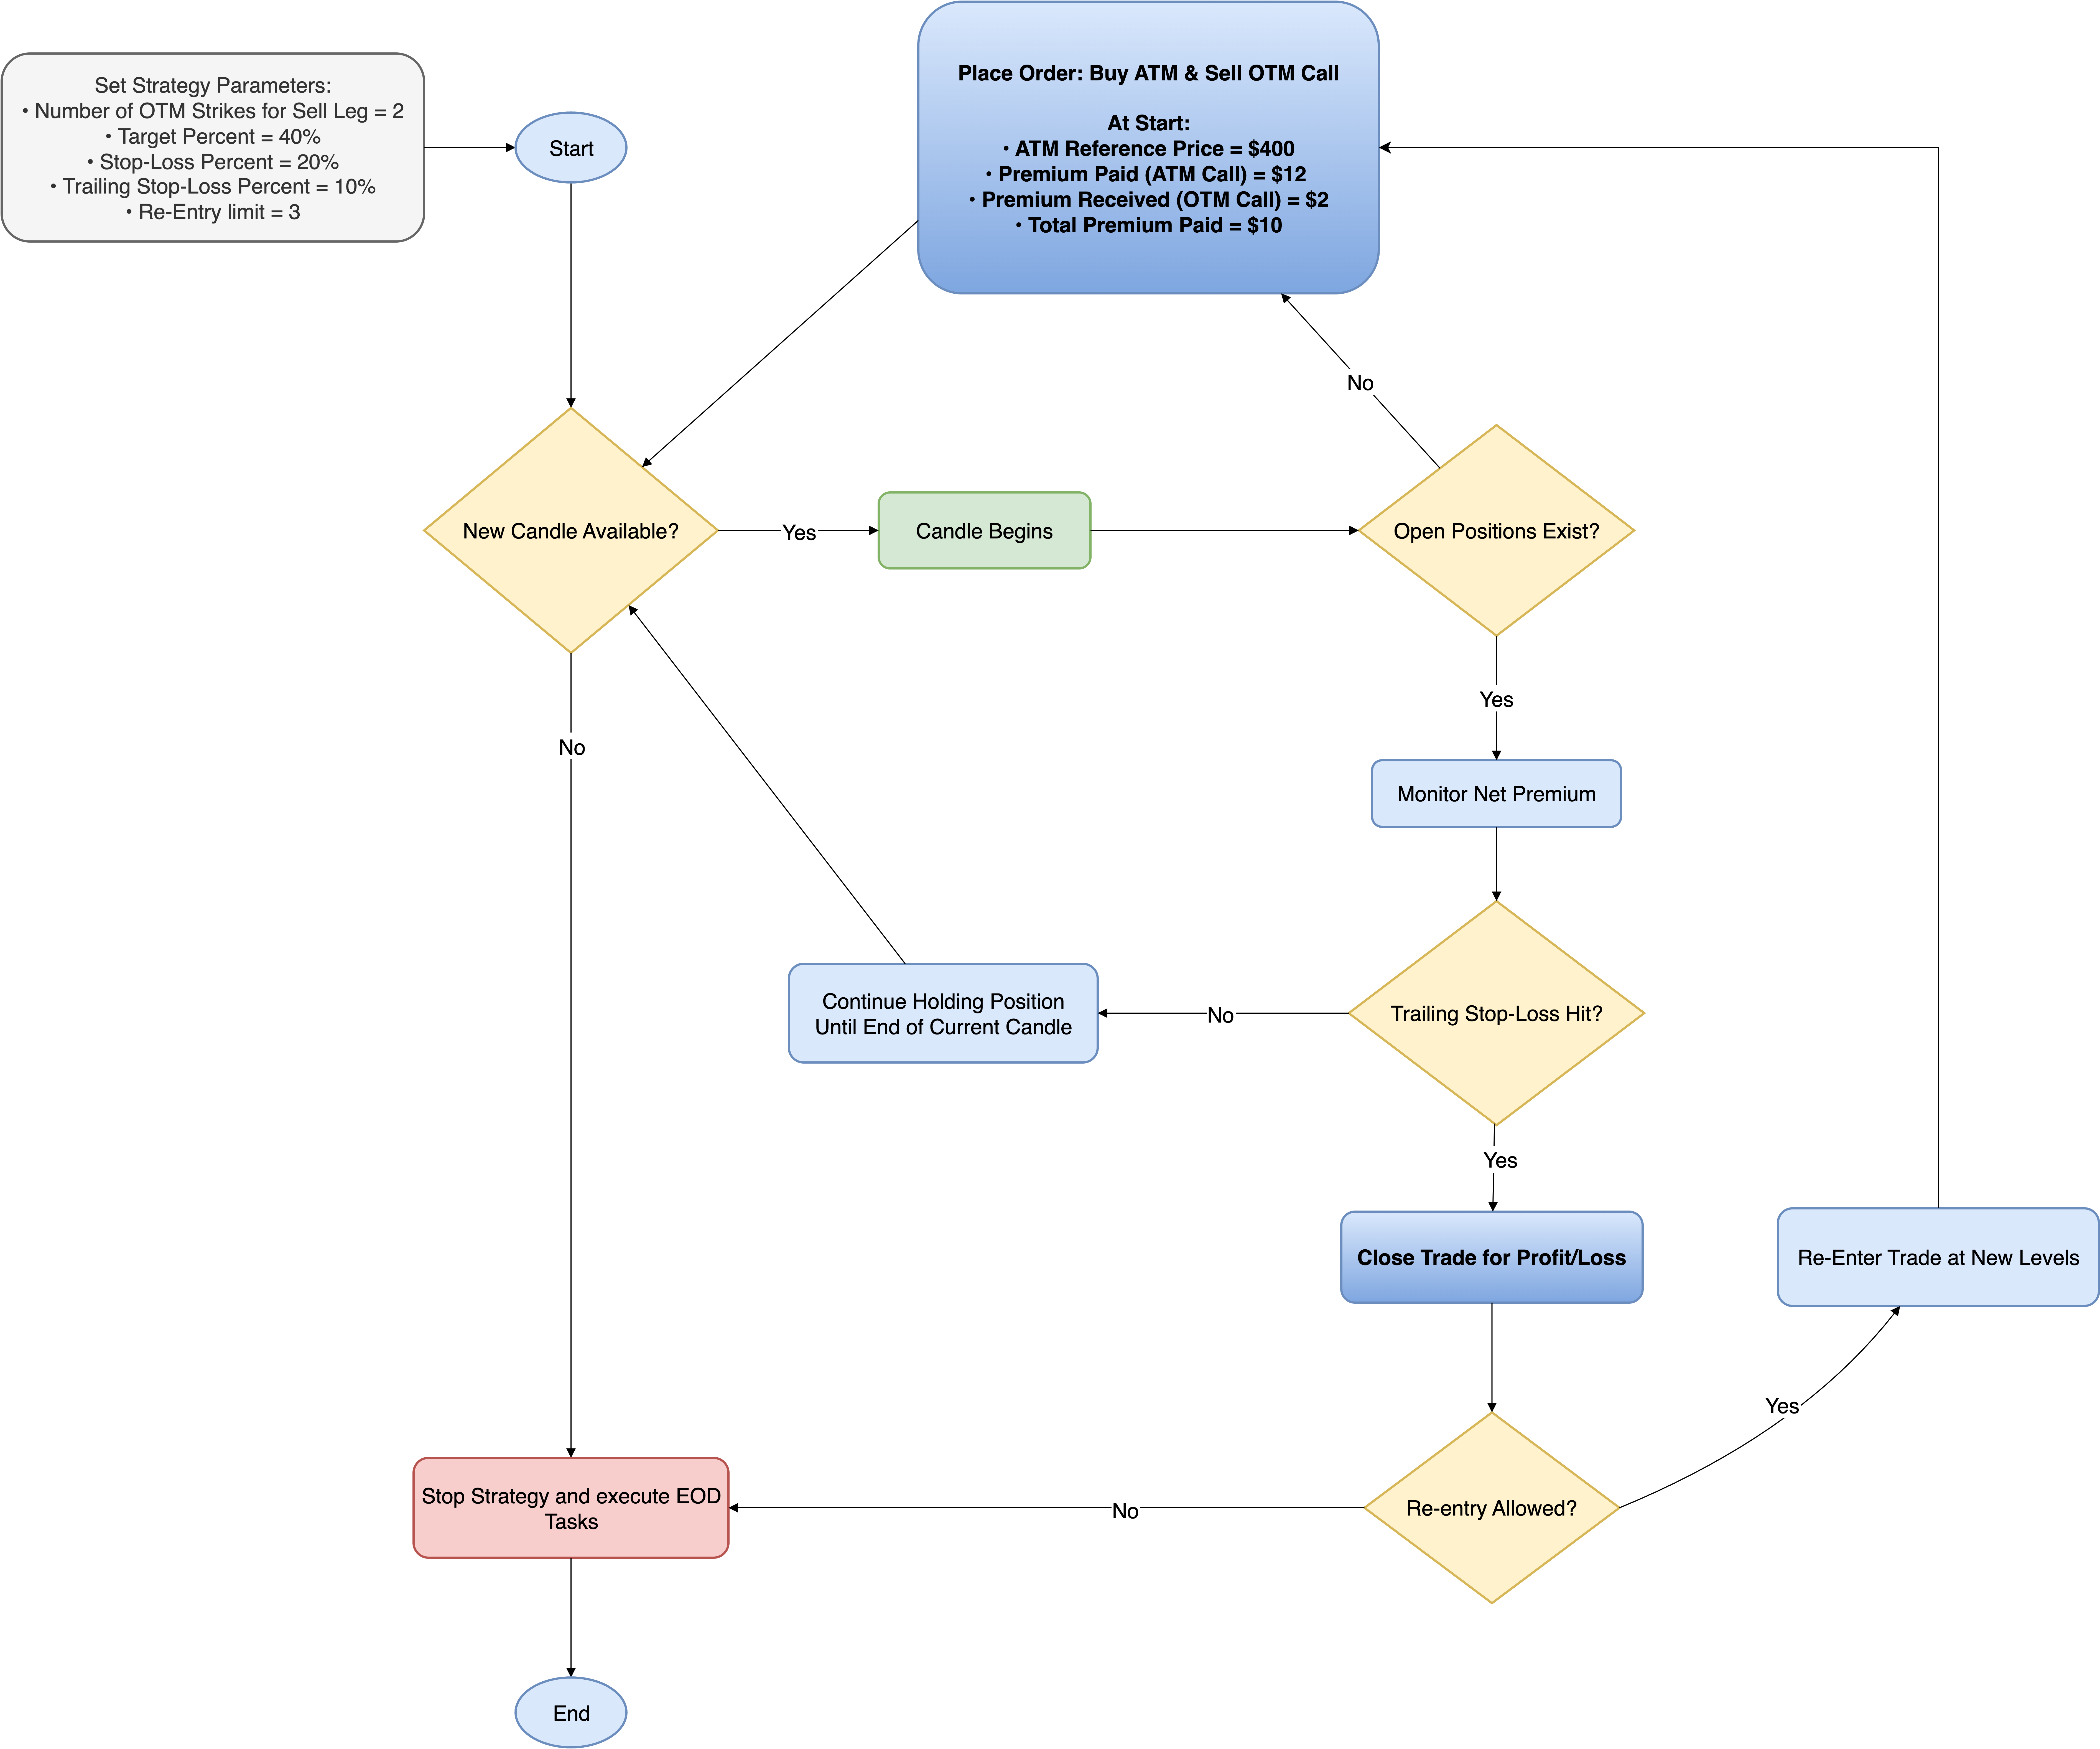
Figure 1: Bull Call Spread Strategy Execution Flowchart (Values align with the first sample in the upcoming Profit & Loss Calculations section).
This section details the Python implementation of the Bull Call Spread strategy, incorporating its defined strike setup, exit rules, and automated re-entry logic.
Selecting Instruments and Strikes for Entry
def strategy_select_instruments_for_entry(self, candle, instruments_bucket):
        selected_instruments, meta = [], []

        for instrument in instruments_bucket:
            self.logger.debug(
                f"Checking entry conditions for base instrument: {instrument} | "
                f"Determining ATM/OTM option instruments and verifying if CE orders are already placed."
            )

            # Skip the instrument if active order already exists
            if self.child_instrument_main_orders.get(instrument):
                continue

            # Retrieve LTP of the base instrument to setup child instruments
            base_instrument_ltp = self.broker.get_ltp(instrument)

            # Track re-entry count for this instrument
            re_entry_count = self.re_entry_count.get(instrument)

            if re_entry_count is not None:
                # If re-entry count exceeds the allowed limit, skip further re-entries
                if re_entry_count >= self.re_entry_limit:
                    continue
                else:
                    # Otherwise increment re-entry count
                    self.re_entry_count[instrument] += 1
            else:
                # Initialize the count for first time instruments
                self.re_entry_count[instrument] = 0

            leg_wise_list = [
                (BrokerOrderTransactionTypeConstants.BUY, OptionsStrikeDirection.ATM.value, 0),
                (BrokerOrderTransactionTypeConstants.SELL, OptionsStrikeDirection.OTM.value, self.no_of_otm_strikes_leg_sell)
            ]

            for action, strike_direction, no_of_strikes in leg_wise_list:
                self.options_instruments_set_up_all_expiries(instrument, 'CE', base_instrument_ltp)  # Set up option instruments for available expiries
                child_instrument = self.get_child_instrument_details(instrument, 'CE', strike_direction, no_of_strikes)  # Retrieve ATM child instrument details for the given instrument

                # Map the base instrument to its corresponding child instrument in the instruments' mapper. This allows tracking of relationships between base and child instruments for further processing.
                self.instruments_mapper.add_mappings(instrument, child_instrument)

                selected_instruments.append(child_instrument)
                meta.append({"action": action, "base_instrument": instrument})

        return selected_instruments, meta
Code Explanation
1. Re-entry Control
 re_entry_count = self.re_entry_count.get(instrument)

            if re_entry_count is not None:

                if re_entry_count >= self.re_entry_limit:
                    continue
                else:

                    self.re_entry_count[instrument] += 1
            else:

                self.re_entry_count[instrument] = 0
Tracks and enforces how many re-entries are taken for each base instrument.
- The counter is maintained per underlying, so both option legs share the same limit.
- It starts at 0, so the first trade doesn’t count toward the re-entry budget.
Prevents over-trading by checking the limit before a new entry and incrementing only after a successful fill.
- If re_entry_used reaches or exceeds re_entry_limit, the strategy skips opening another spread.
2. Efficient LTP Retrieval
Fetches the latest market price (Last Traded Price) only once at the start of processing each instrument.
This single retrieval is then reused for setting up all child option legs, avoiding repeated broker API calls and improving execution efficiency.
3. ATM/OTM Leg Setup
leg_wise_list = [
    (BrokerOrderTransactionTypeConstants.BUY, OptionsStrikeDirection.ATM.value, 0),
    (BrokerOrderTransactionTypeConstants.SELL, OptionsStrikeDirection.OTM.value, self.no_of_otm_strikes_leg_sell)
]
Defines the two required legs for the Bull Call Spread:
-
Buy Leg: At-the-money call with a strike offset of 0, meaning the strike is exactly at the current underlying price (pure ATM, no shift up or down).
-
Sell Leg: Out-of-the-money call offset by self.no_of_otm_strikes_leg_sell, which specifies how many strikes above ATM to sell.
4. Instrument Mapping
Links each base instrument to its child option legs, allowing later modules to efficiently track, exit, or re-enter both legs of the spread as a single position.
Creating an Order for a Position
def strategy_enter_position(self, candle, instrument, meta):

   child_instrument = instrument
   base_instrument = self.instruments_mapper.get_base_instrument(child_instrument)
   _order = self.broker.OrderRegular(instrument=child_instrument, order_transaction_type=meta['action'], order_code=self.order_code, order_variety=BrokerOrderVarietyConstants.MARKET, quantity=self.number_of_lots * child_instrument.lot_size)

   # Store details of successful orders
   if check_order_placed_successfully(_order):
       self.child_instrument_main_orders.setdefault(base_instrument, {})[meta['action']] = _order
   else:

       # Protection logic incase any of the legs fail to get placed - this will help avoid having naked positions
       self.logger.critical('Order placement failed for one of the legs. Exiting position for other leg, if possible and stopping strategy.')
       self.exit_all_positions_for_base_instrument(base_instrument)
       raise ABSystemExit

   return _order
Code Explanation
1. Mapping Base and Child Instruments
Retrieves the underlying (base) instrument for the selected option leg. This ensures the strategy can track which option contract belongs to which underlying for later exits or re-entries.
2. Market Order Creation
Places a market order, guaranteeing immediate execution at the best available price rather than waiting for a specific limit price: important when precise timing is required for both legs of a spread.
3. Lot Size Calculation
Multiplies the user-defined number of lots by the option’s lot size so the order quantity matches the contract’s trading unit.
4. Storing Details of Successful Orders
# Store details of successful orders
if check_order_placed_successfully(_order):
    self.child_instrument_main_orders.setdefault(base_instrument, {})[meta['action']] = _order
-
check_order_placed_successfully(_order)
Confirms that the broker accepted and placed the order without errors.
-
self.child_instrument_main_orders.setdefault(base_instrument, )
Ensures there is a dictionary entry for the base instrument. If none exists, it creates an empty one.
-
[meta['action']] = _order
Saves the successfully placed order under its action type (e.g., BUY or SELL) for that base instrument.
This allows the strategy to easily track and later manage each leg of the spread by its underlying instrument and action.
5. Naked Position Protection
# Store details of successful orders
if check_order_placed_successfully(_order):
    self.child_instrument_main_orders.setdefault(base_instrument, {})[meta['action']] = _order
else:
    # Protection logic incase any of the legs fail to get placed - this will help avoid having naked positions
    self.logger.critical(
        'Order placement failed for one of the legs. Exiting position for other leg, if possible and stopping strategy.'
    )
    self.exit_all_positions_for_base_instrument(base_instrument)
    raise ABSystemExit
If either leg fails to execute, the code immediately exits any filled leg and raises ABSystemExit.
This prevents holding only one side of the spread, which would create an unhedged (naked) position and expose the trader to unlimited directional risk.
Exit Strategy: Target and Stop-losses
def check_exit_conditions(self, base_instrument, child_leg_orders_dict):
        """
        Evaluate all exit rules for the Bull Call Spread.

        Checks:
        • Target profit - exit if spread rises to the profit target.
        • Hard stop-loss - exit if spread falls below the stop-loss threshold.
        • Trailing stop-loss - once the spread makes new highs, trail a stop to lock in profits.
        """

        # Retrieve current orders and latest traded prices (LTP) for both legs
        ltp_leg_buy = self.broker.get_ltp(child_leg_orders_dict[BrokerOrderTransactionTypeConstants.BUY].instrument)
        ltp_leg_sell = self.broker.get_ltp(child_leg_orders_dict[BrokerOrderTransactionTypeConstants.SELL].instrument)

        # Initialize key levels at entry:
        if not self.spread_entry:
            entry_price_leg_buy = self.child_instrument_main_orders.get(base_instrument)[BrokerOrderTransactionTypeConstants.BUY].entry_price
            entry_price_leg_sell = self.child_instrument_main_orders.get(base_instrument)[BrokerOrderTransactionTypeConstants.SELL].entry_price
            self.spread_entry = entry_price_leg_buy - entry_price_leg_sell  # spread at entry
            self.stoploss_premium = self.spread_entry * (1 - self.stoploss_percentage / 100)
            self.target_premium = self.spread_entry * (1 + self.target_percentage / 100)

        # Current spread price
        self.spread_current = ltp_leg_buy - ltp_leg_sell

        self.logger.info(f"Target and Hard Stoploss Check: Entry Spread price: {self.spread_entry:.2f}"
                         f"Current Spread price: {self.spread_current:.2f}"
                         f"Target Threshold: {self.target_premium:.2f}"
                         f"Stop-loss Threshold : {self.stoploss_premium:.2f}")

        # Target Profit Check
        if self.spread_current > self.target_premium:
        self.logger.debug(f"Target profit reached: Current Net Premium ({self.spread_current}) dropped below Target Threshold ({self.target_premium}). Exiting positions.")
            self.spread_entry = None
            return True

        # Hard Stop-loss Check
        if self.spread_current < self.stoploss_premium:
            self.logger.debug(f"Stop-loss triggered: Current Net Premium ({self.spread_current}) exceeded Stop-loss Threshold ({self.stoploss_premium}). Exiting positions.")
            self.spread_entry = None
            return True

        # Activate trailing stop only after spread moves by at least trailing % above entry.
        if not self.highest and self.spread_current > self.spread_entry / (1 - self.tsl_percentage / 100):
            self.highest = self.spread_current  # first highest spread
            self.trailing_stop = self.highest * (1 - self.tsl_percentage / 100)  # initial trailing stop

        # Trailing Stop-loss (TSL) check
        if self.highest:
            self.logger.info(f"Trailing Stop-loss Check: Entry Spread price: {self.spread_entry:.2f} "
                             f"Current Spread price: {self.spread_current:.2f}"
                             f"New Highest: {self.highest:.2f}"
                             f"Trailing Stop: {self.trailing_stop:.2f}"
                             f"(Trail %={self.tsl_percentage})")

            # Update trailing stop whenever current spread exceeds previous high
            if self.spread_current > self.highest:
                self.highest = self.spread_current
                self.trailing_stop = self.highest * (1 - self.tsl_percentage / 100)

            # Trigger TSL exit if current spread falls below traiing stop
            if self.spread_current < self.trailing_stop:
                self.logger.info(f"Trailing Stop-loss triggered: Current Net Premium ({self.spread_current} dropped below Trailing Stop ({self.trailing_stop}. Exiting positions.")

                # Reset so next entry can be reinitialize
                self.highest = self.spread_entry = self.trailing_stop = None
                return True

        return False
Code Explanation
1. One-time setup of Target Profit/Stop-loss levels
if not self.spread_entry:
    ...
    self.spread_entry = entry_buy - entry_sell
    self.stoploss_premium = self.spread_entry * (1 - self.stoploss_percentage/100)
    self.target_premium   = self.spread_entry * (1 + self.target_percentage/100)
All control levels (Target Profit/Stop-loss) are computed once at first evaluation from the actual filled prices, ensuring exits are tied to real entry spreads rather than quotes.
2. Live spread from legs (buy − sell)
if not self.spread_entry:
    ...
    self.spread_entry = entry_buy - entry_sell
    self.stoploss_premium = self.spread_entry * (1 - self.stoploss_percentage/100)
    self.target_premium   = self.spread_entry * (1 + self.target_percentage/100)
    self.spread_current = ltp_leg_buy - ltp_leg_sell
The decision metric is the net spread value, not the underlying price. This aligns exits with the P&L driver of a debit call spread.
3. Priority of exits: Targets → Stop-loss → Trailing Stop-loss
Targets/Hard Stop are checked before Trailing Stops. This guarantees fixed thresholds take precedence; the trailing stop is a fallback once the trade has moved favorably.
4. Activating the trailing stop only after a favorable move
if not self.highest and self.spread_current > self.spread_entry / (1 - self.tsl_percentage/100):
    self.highest = self.spread_current
    self.trailing_stop = self.highest * (1 - self.tsl_percentage/100)
TSL is not active at entry. It’s activated only after the spread rallies enough that a trailing stop at tsl% would sit above (or at) entry, avoiding premature exits around the entry zone.
5. Ratchet logic & state reset
if self.spread_current > self.highest:
    self.highest = self.spread_current
    self.trailing_stop = self.highest * (1 - self.tsl_percentage / 100)
- When a new high is made, highest and trailing_stop are recalculated so the stop only moves upwards.
- On a TSL exit, highest, spread_entry, and trailing_stop are reset to None, ensuring a clean slate for any subsequent re-entry cycle.
Validating Strategy Parameters in Bull Call Spread Strategy
The following code snippet validates key inputs before execution:
def validate_parameters(self):
   """ Validates required strategy parameters. """
   check_argument(
       self.strategy_parameters, "extern_function", lambda x: len(x) >= 5,
       err_message=(
           "Need 5 parameters for this strategy: \n"
           "(1) NUMBER_OF_OTM_STRIKES_SELL_LEG \n"
           "(2) TARGET_PERCENTAGE \n"
           "(3) STOPLOSS_PERCENTAGE \n"
           "(4) TRAILING_STOPLOSS_PERCENTAGE \n"
           "(5) RE_ENTRY_LIMIT"
       )
   )

   # Validate expiry dates
   if len(self.get_allowed_expiry_dates()) != self.number_of_allowed_expiry_dates:
       self.logger.info(f"Allowed expiry dates: {self.number_of_allowed_expiry_dates}, got {len(self.get_allowed_expiry_dates())}. Exiting...")
       raise ABSystemExit

   # Validate numeric strategy parameters
   for param in (self.re_entry_limit, self.no_of_otm_strikes_leg_sell):
       check_argument(param, "extern_function", is_positive_int, "Value should be positive integer")

   # Validate percentage strategy parameters
   for param in (self.target_percentage, self.stoploss_percentage, self.tsl_percentage,):
       check_argument(param, "extern_function", is_nonnegative_int_or_float, "Value should be >0")
Failure Case 1: Missing Required Parameters
self.strategy_parameters = {}  # nothing supplied
self.number_of_allowed_expiry_dates = 1
self.get_allowed_expiry_dates = lambda: [object()]  # pretend one expiry exists
validate_parameters()
Error:
self.strategy_parameters = {}  # nothing supplied
self.number_of_allowed_expiry_dates = 1
self.get_allowed_expiry_dates = lambda: [object()]  # pretend one expiry exists
validate_parameters()
Need 5 parameters for this strategy:
(1) NUMBER_OF_OTM_STRIKES_SELL_LEG
(2) TARGET_PERCENTAGE
(3) STOPLOSS_PERCENTAGE
(4) TRAILING_STOPLOSS_PERCENTAGE
(5) RE_ENTRY_LIMIT
Reason: Fewer than the required keys were provided.
Failure Case 2: Expiry date mismatch
self.strategy_parameters = {
    "NUMBER_OF_OTM_STRIKES_SELL_LEG": 1,
    "TARGET_PERCENTAGE": 30,
    "STOPLOSS_PERCENTAGE": 20,
    "TRAILING_STOPLOSS_PERCENTAGE": 10,
    "RE_ENTRY_LIMIT": 2,
}
self.number_of_allowed_expiry_dates = 1
self.get_allowed_expiry_dates = lambda: []  # no eligible expiries

validate_parameters()
Error (logged then raised):
Allowed expiry dates: 1, got 0. Exiting...
Reason: Strategy expects one tradable expiry but found none, so it aborts to avoid undefined behavior.
Failure Case 3: Invalid integer fields (non-positive)
Allowed expiry dates: 1, got 0. Exiting...self.strategy_parameters = {
    "NUMBER_OF_OTM_STRIKES_SELL_LEG": 0,  # invalid
    "TARGET_PERCENTAGE": 30,
    "STOPLOSS_PERCENTAGE": 20,
    "TRAILING_STOPLOSS_PERCENTAGE": 10,
    "RE_ENTRY_LIMIT": -1,                  # invalid
}
self.number_of_allowed_expiry_dates = 1
self.get_allowed_expiry_dates = lambda: ["2025-09-25"]

validate_parameters()
Error:
Value should be a positive integer
Reason: Both NUMBER_OF_OTM_STRIKES_SELL_LEG and RE_ENTRY_LIMIT must be strictly positive integers.
Failure Case 4: Invalid percentage fields (≤ 0 or non-numeric)
self.strategy_parameters = {
    "NUMBER_OF_OTM_STRIKES_SELL_LEG": 1,
    "TARGET_PERCENTAGE": 0,          # invalid (must be > 0)
    "STOPLOSS_PERCENTAGE": -5,       # invalid
    "TRAILING_STOPLOSS_PERCENTAGE": "ten",  # invalid type
    "RE_ENTRY_LIMIT": 2,
}
self.number_of_allowed_expiry_dates = 1
self.get_allowed_expiry_dates = lambda: ["2025-09-25"]

validate_parameters()
Error:
Value should be >0
Reason: TARGET_PERCENTAGE, STOPLOSS_PERCENTAGE, and TRAILING_STOPLOSS_PERCENTAGE must be numeric and greater than zero.
💡 Want to see the complete strategy? Check out the full implementation here.
Ideal Market Conditions for Bull Call Spread
When to Use
The Bull Call Spread is best suited for markets expected to move moderately higher rather than remain flat or surge dramatically. It thrives when a clear bullish trend is present but the trader wants defined risk and lower upfront cost compared to buying a single call.
Typical scenarios include:
• Post-Breakout Continuation: After a confirmed breakout from a resistance zone where steady upside is expected.
• Bullish Earnings Outlook: Around earnings releases when positive sentiment supports a measured rally.
• Supportive Economic or Policy Environment: When economic data or government/central-bank actions signal gradual market growth.
• Moderate Implied Volatility: When IV is balanced-high enough to indicate movement potential but not so high that call premiums become costly.
Interpreting the Bull Call Spread Payoff Structure
The following payoff diagram illustrates the profit-and-loss dynamics of a Low-Risk Bull Call Spread on the QQQ ETF, matching the parameters described earlier.
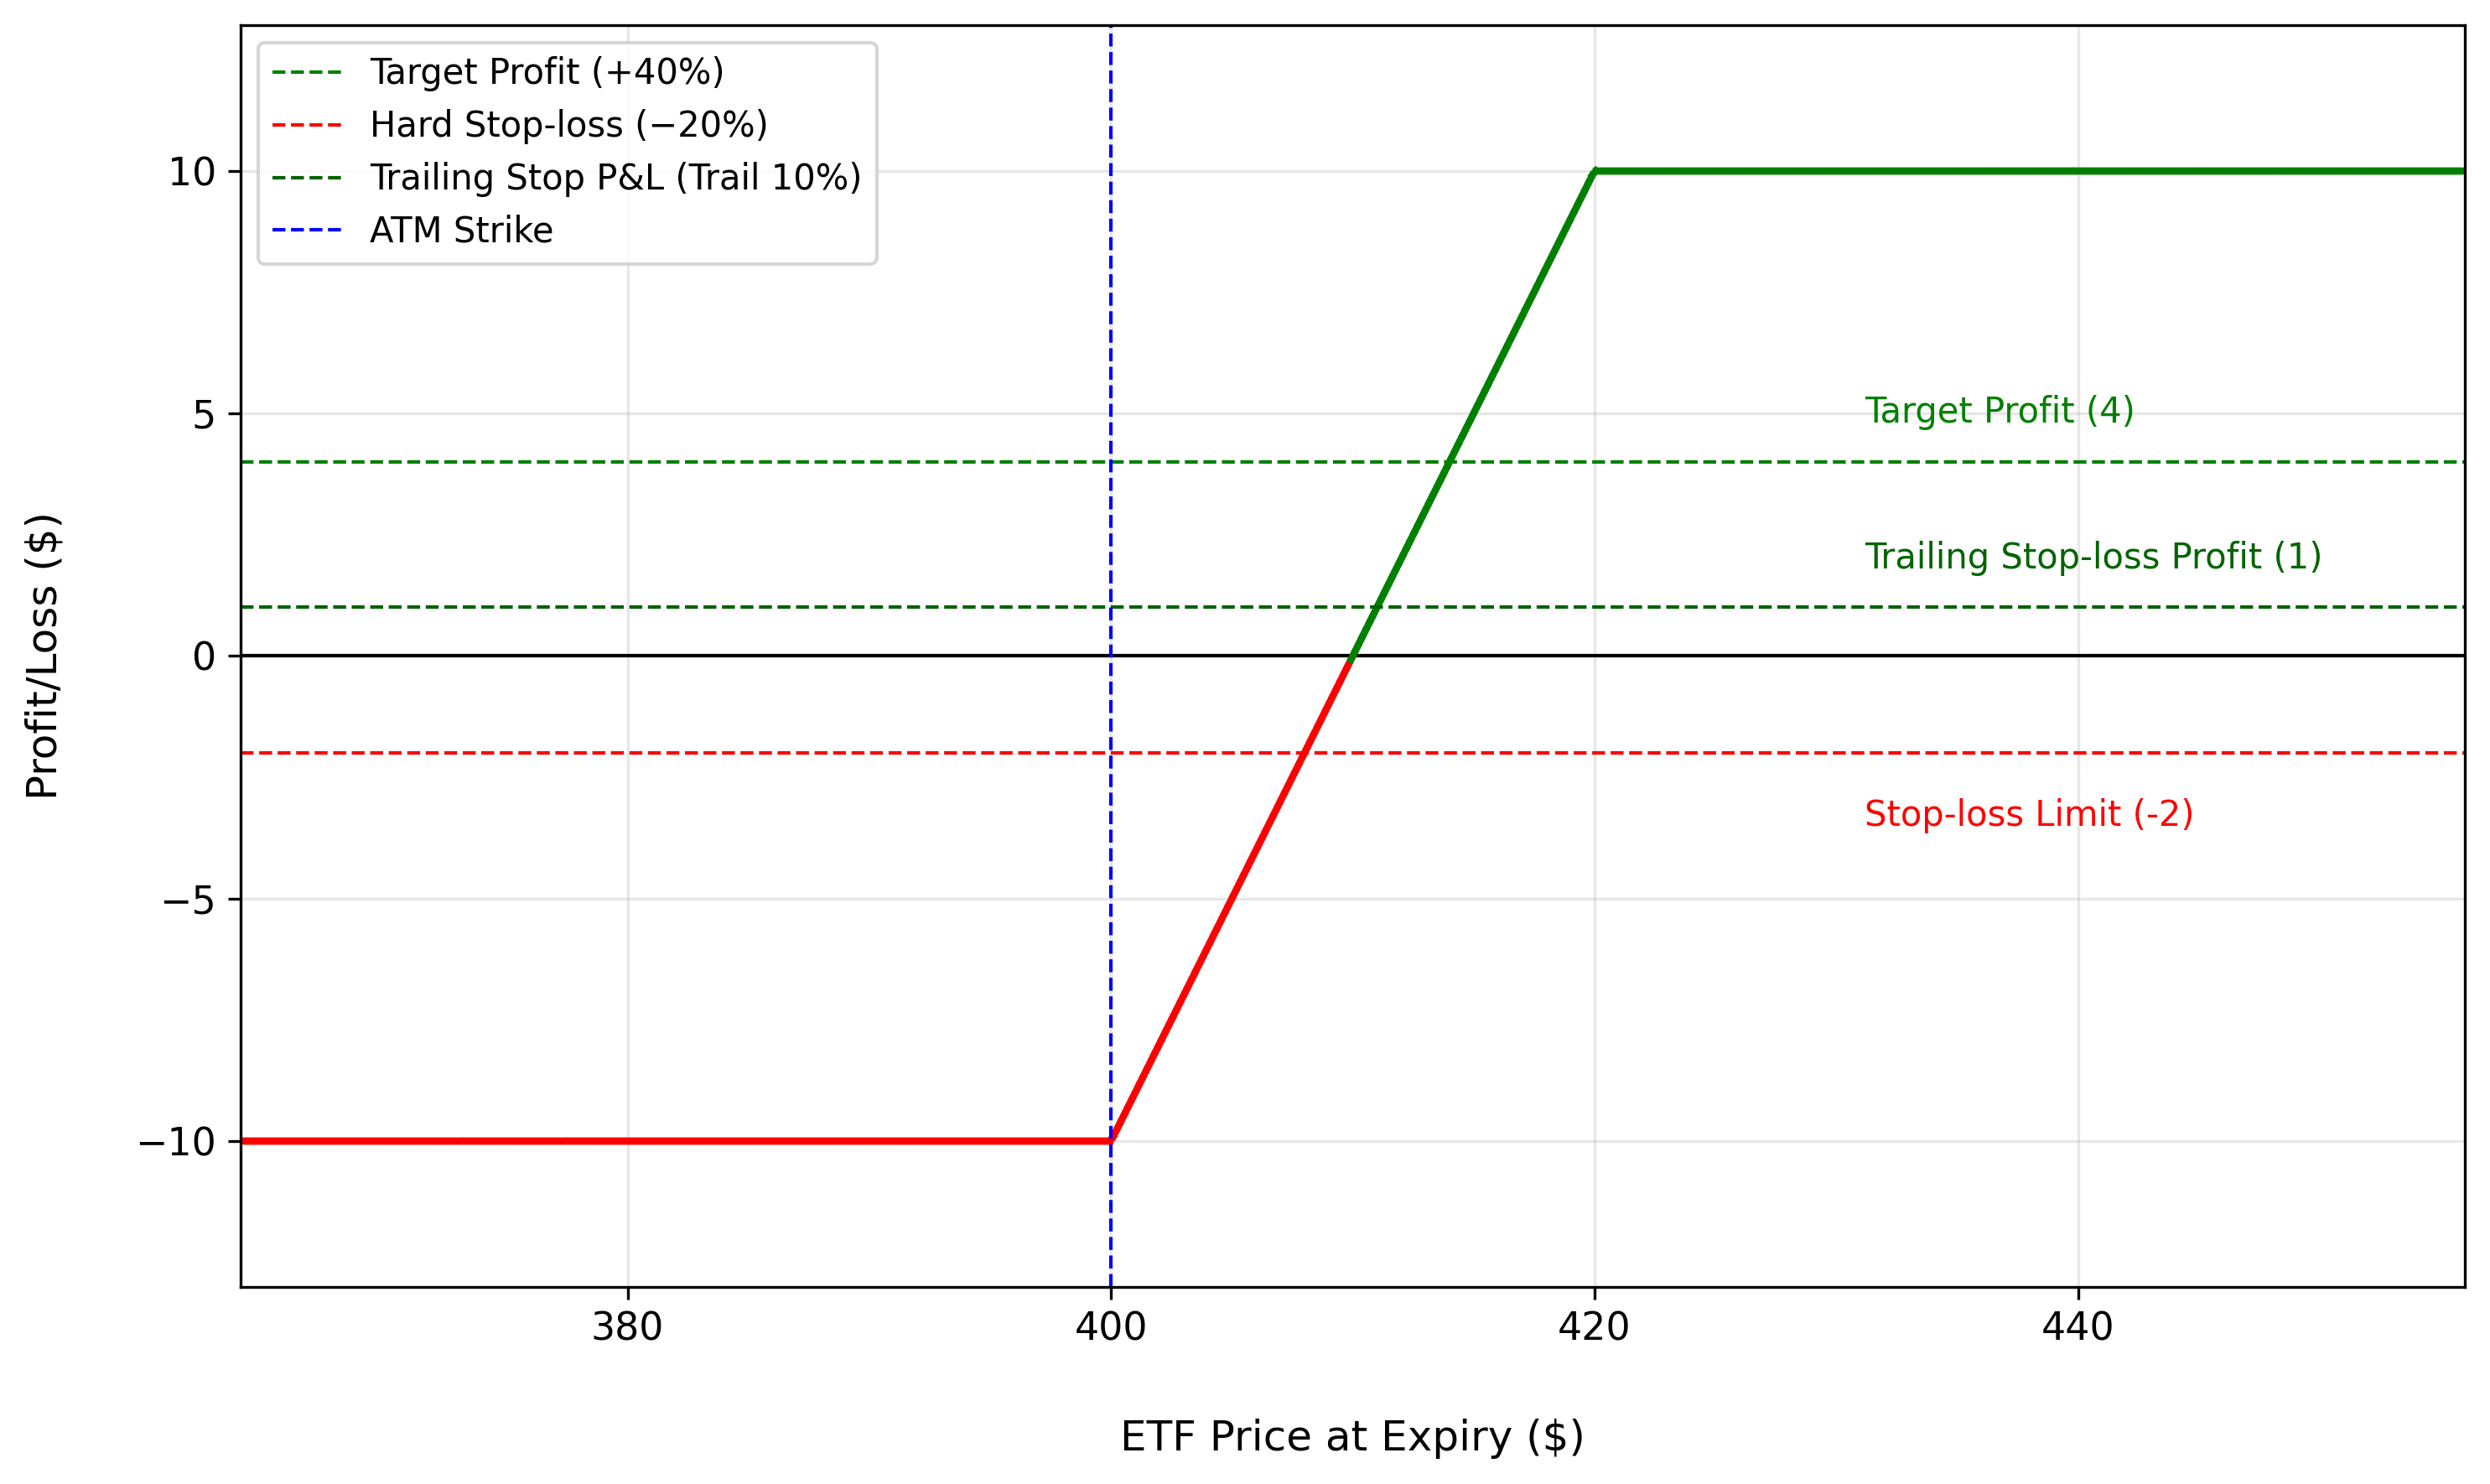
Figure 2: Profit and Loss Diagram
The green segment of the curve represents the potential profit zone.
-
Maximum profit occurs when the QQQ price closes at or above the short-call strike ($420) on expiry.
-
In this setup the long $400 call is purchased and the $420 call is sold, so the payoff flattens once the underlying trades above $420, capping the gain.
-
The maximum profit is the difference between strikes minus the net debit ($10), which equals $10 per share.
The red segment indicates the potential loss zone.
- Losses are limited to the net debit of $10 per share, which occurs if the QQQ expires at or below $400, rendering both calls worthless.
Dashed reference lines highlight key exit rules:
-
Target Profit (+40%) - a pre-defined take-profit at $4 gain per spread.
-
Hard Stop (–20%) - an exit if the spread value falls 20% below the $10 entry, limiting loss to about $2 per spread.
-
Trailing Stop (10% trail) - dynamically ratchets upward as the spread price rises, helping lock in profits if the spread retraces after making new highs.
Profit and Loss Calculations for Low and High Risk Versions
1. Low Risk Bull Call Spread Strategy
The previous diagram sets up an example for the low risk version of the bull call spread.
Key Parameters
-
Target Profit (target_percentage): 40% of the net debit ( $10)
-
Stop-Loss (stoploss_percentage): 20% of the net debit
-
Trailing Stop-Loss (tsl_percentage): 10% below the highest spread value reached after entry
-
Instrument: QQQ – Invesco Nasdaq-100 ETF
-
Options Expiry Type: Nearest Monthly Expiry
-
Strikes (num_of_otm_strikes_sell_leg): Buy ATM $400 Call and Sell OTM $420 Call (≈ two strikes apart; actual QQQ strike increments may differ).
Calculations
(Assume a simple 1:1 relationship between the QQQ underlying and the spread for illustration.)
-
Total Premium Paid:
Premium Paid - Premium Received = $12.00 – $2.00 = $10.00 -
Target Profit (0.4 x Total Premium Paid):
$10.00 × 0.40 = $4
Exit when net profit reaches +$4.
-
Hard Stop-Loss (0.2 x Total Premium Paid):
$10.00 × 0.20 = $2
Maximum possible loss capped at $2
-
Trailing Stop-Loss:
Set 10% below the highest spread after entry.
Example: if the spread rises from $10.00 to $20.00,
TSL = 20.00 × (1 – 0.1) = $18.
If the spread then falls below $18 to say, $15, the position exits, locking roughly $5 profit relative to the $10.00 entry.
-
Maximum Profit:
Strike Difference - Net Debit = ($420 – $400) – $10.00 = $10.00
-
Breakeven:
Lower Strike + Net Debit = $400 + $10.00 = $410.00
Target-Profit & Hard Stop-Loss Outcomes
| Spot Price | P&L With Target/Stop-loss | P&L Without Target/Stop-loss |
|---|---|---|
| $392 | Exit around $8 = –$2 (Capped) | -$10 (Maximum Loss) |
| $400 (Breakeven) | Exit around $10.00 = $0 | $0 |
| Rises to $406, then falls back to $400 | Exit around $14 (target hit) = +$4 | $0 |
Trailing Stop-Loss Outcomes (10% trail)
• Entry spread = $10.00 • Target Profit = $14 • Hard Stop = $2
(Assume the spread climbs somewhere between $411 and $414, then reverses, so only the TSL governs the exit.)
| Spot Price | P&L With Trailing Stop-loss | P&L Without Trailing Stop-loss |
|---|---|---|
| Rises to $411, then falls to $410 (Breakeven) | Exit around $10.00 (stop ≈ $11 × 0.9 ≈ $10.00) = $0 | $0 |
| Rises to $413, then falls to $411 | Exit around $12 (stop ≈ $13 × 0.9 ≈ $12) = +$1 (Profit) | –$10 (Maximum Loss) |
| Rises to $413, then falls to $412 | Exit around $12 (stop = $13 × 0.9 ≈ $12) = +$2 (Profit) | –$10 (Maximum Loss) |
2. High Risk Bull Call Spread Strategy
The diagram below shows the profit and loss profile for a high-risk Bull Call Spread setup:
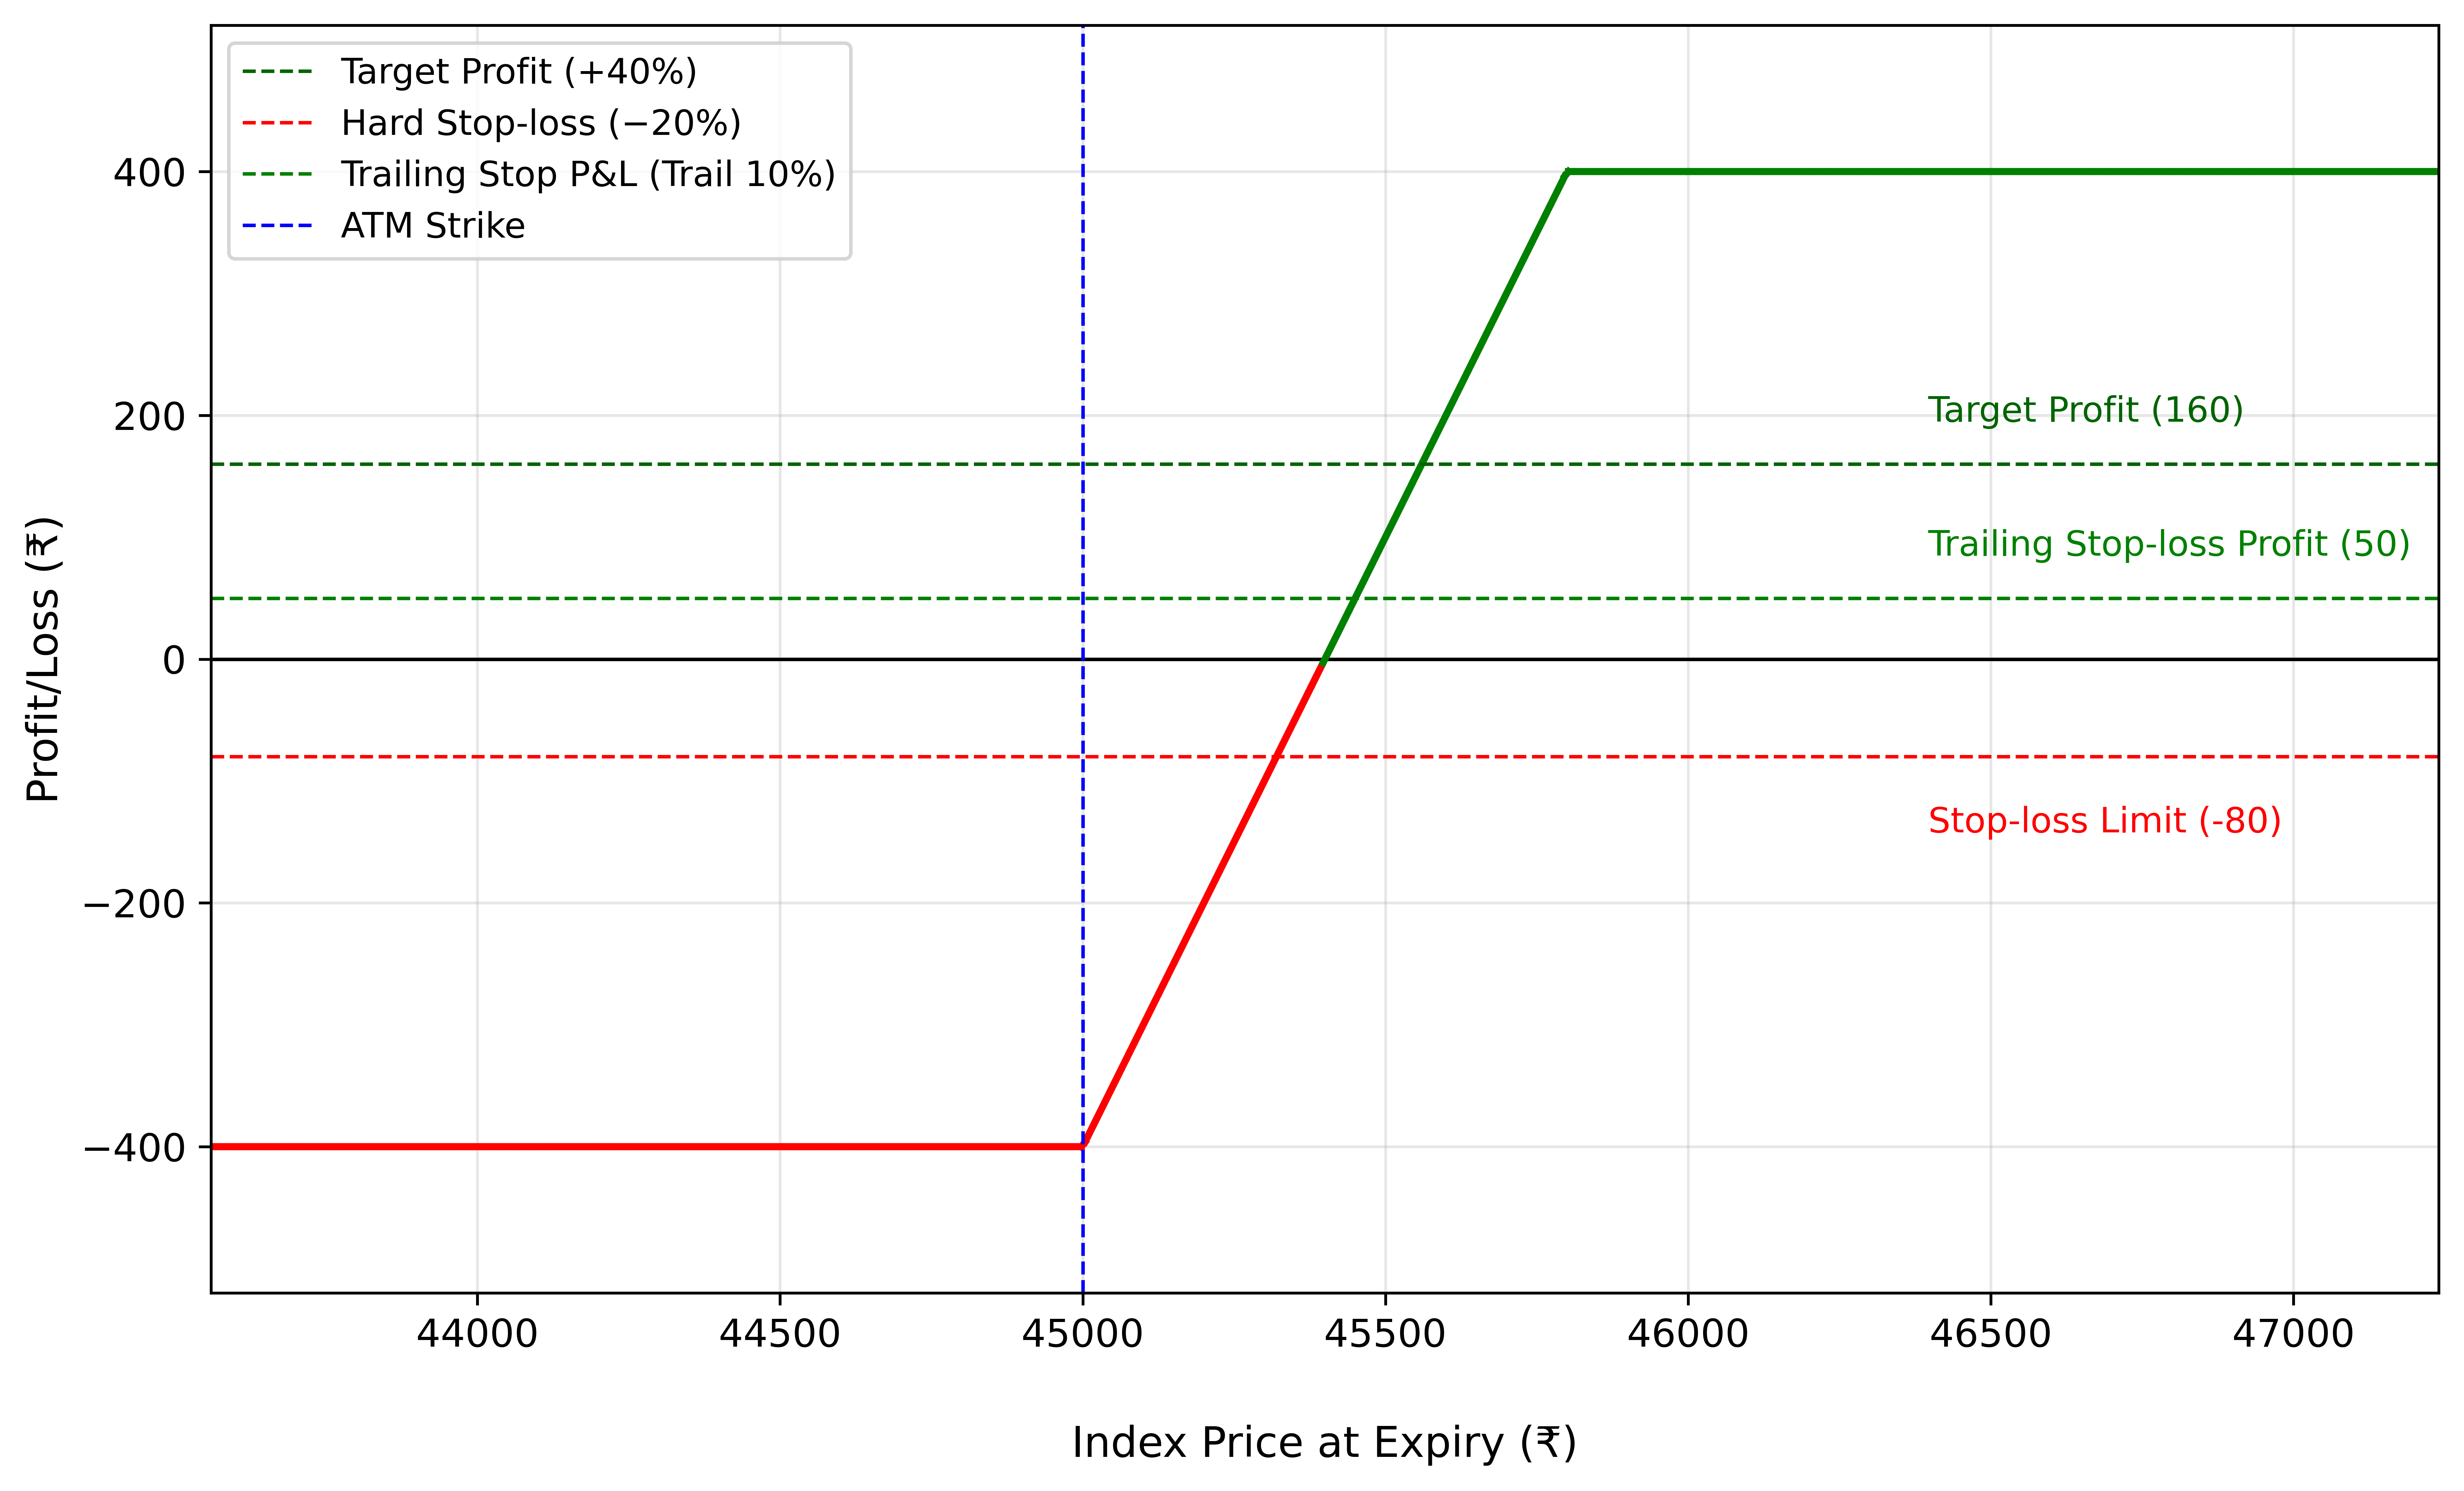
Figure 3: Profit and Loss Diagram: High Risk Version
Key Parameters:
-
Target Profit (target_percentage): 40% of the net debit (₹400)
-
Stop-Loss (stoploss_percentage): 20% of the net debit
-
Trailing Stop-Loss (tsl_percentage): 10% below the highest spread value reached after entry
-
Instrument: NIFTY Bank Index
-
Options Expiry Type: Nearest Monthly Expiry
-
Strikes (num_of_otm_strikes_sell_leg): Buy ATM Call (45,000) and Sell OTM Call (45,500) - 5 strikes apart
Calculations:
(Assume a simple 1:1 relationship between the Nifty Bank index and the spread for illustration.)
- Total Premium Paid:
Premium Paid – Premium Received = ₹500 - ₹100 = ₹400
- Target Profit (0.4 x Total Premium Paid):
₹400 × 0.40 = ₹160
So, we exit when net profit reaches +₹160.
- Hard Stop-Loss (0.2 × Total Premium Paid):
₹400 × 0.20 = ₹80
Maximum loss capped at ₹80.
- Trailing Stop-Loss:
Trail is set at 20% below the highest spread after entry.
Example: If the spread rises from ₹400 to ₹550,
TSL = 550 × (1 - 0.20) = ₹440.
The position exits if the spread then falls below ₹440, locking in roughly ₹40 profit relative to the ₹400 entry.
- Maximum Profit:
Strike Difference - Net Debit = (45,500 - 45,000) - ₹400 = ₹100
- Breakeven:
Lower Strike + Net Debit = 45,000 + ₹400 = ₹45,400
Target-Profit & Hard Stop-Loss Outcomes
| Spot Price | P&L With Target/Stop-loss | P&L Without Target/Stop-loss |
|---|---|---|
| ₹45,320 | Exit around ₹320 = –₹80 (Capped) | –₹400 (Maximum Loss) |
| ₹45,400 (Breakeven) | Exit around ₹400 = ₹0 | ₹0 |
| Rises to ₹45,560, then falls back to ₹45,000 | Exit around ₹560 = +₹160 (Target Profit) | ₹0 |
Trailing Stop-Loss Outcomes (TSL - 10% trail)
• Entry Spread = ₹400 • Target Profit = ₹560 • Hard Stop = ₹320
(Assume the spot climbs somewhere between ₹45444 and ₹45560, then reverses, so only the TSL governs the exit.)
| Spot Price | P&L With Trailing Stop-loss | P&L Without Trailing Stop-loss |
|---|---|---|
| Rises to ₹45,444, then falls to ₹45,400 (Breakeven) | Exit around ₹400 (stop = 444 × 0.9 ≈ ₹400) = ₹0 | ₹0 |
| Rises to ₹45,480, then falls to ₹45,432 (TSL triggered) | Exit around ₹432 (stop = 480 × 0.9 ≈ ₹432) = +₹32 (Profit) | –₹400 (Maximum Loss) |
| Rises to ₹45,500, then falls to ₹45,450 (TSL triggered) | Exit around ₹450 (stop = 500 × 0.9 ≈ ₹450) = +₹50 (Profit) | –₹400 (Maximum Loss) |
Comparing Bull Call vs. Bear Put Spread
The Bull Call Spread and Bear Put Spread are both defined-risk, vertical options strategies designed for directional trading. While the Bull Call Spread profits from moderate upward movement, the Bear Put Spread seeks to capitalize on moderate downward movement. Despite opposite directional biases, they share a similar debit-spread construction and risk-reward profile.
| Feature | Bull Call Spread | Bear Put Spread |
|---|---|---|
| Market Outlook | Moderately bullish - expect the underlying to rise | Moderately bearish - expect the underlying to fall |
| Option Types Used | Long Call (lower strike) + Short Call (higher strike) | Long Put (higher strike) + Short Put (lower strike) |
| Initial Trade Type | Debit (Net premium paid) | Debit (Net premium paid) |
| Maximum Profit | Difference between strikes minus net debit | Difference between strikes minus net debit |
| Maximum Loss | Net debit paid | Net debit paid |
| Breakeven Point | Lower strike + net debit | Higher strike - net debit |
| Implied Volatility | Long Vega (benefits from rising IV before entry/hedge) | Long Vega (benefits from rising IV before entry/hedge) |
| Theta Impact | Negative (time decay works against you) | Negative (time decay works against you) |
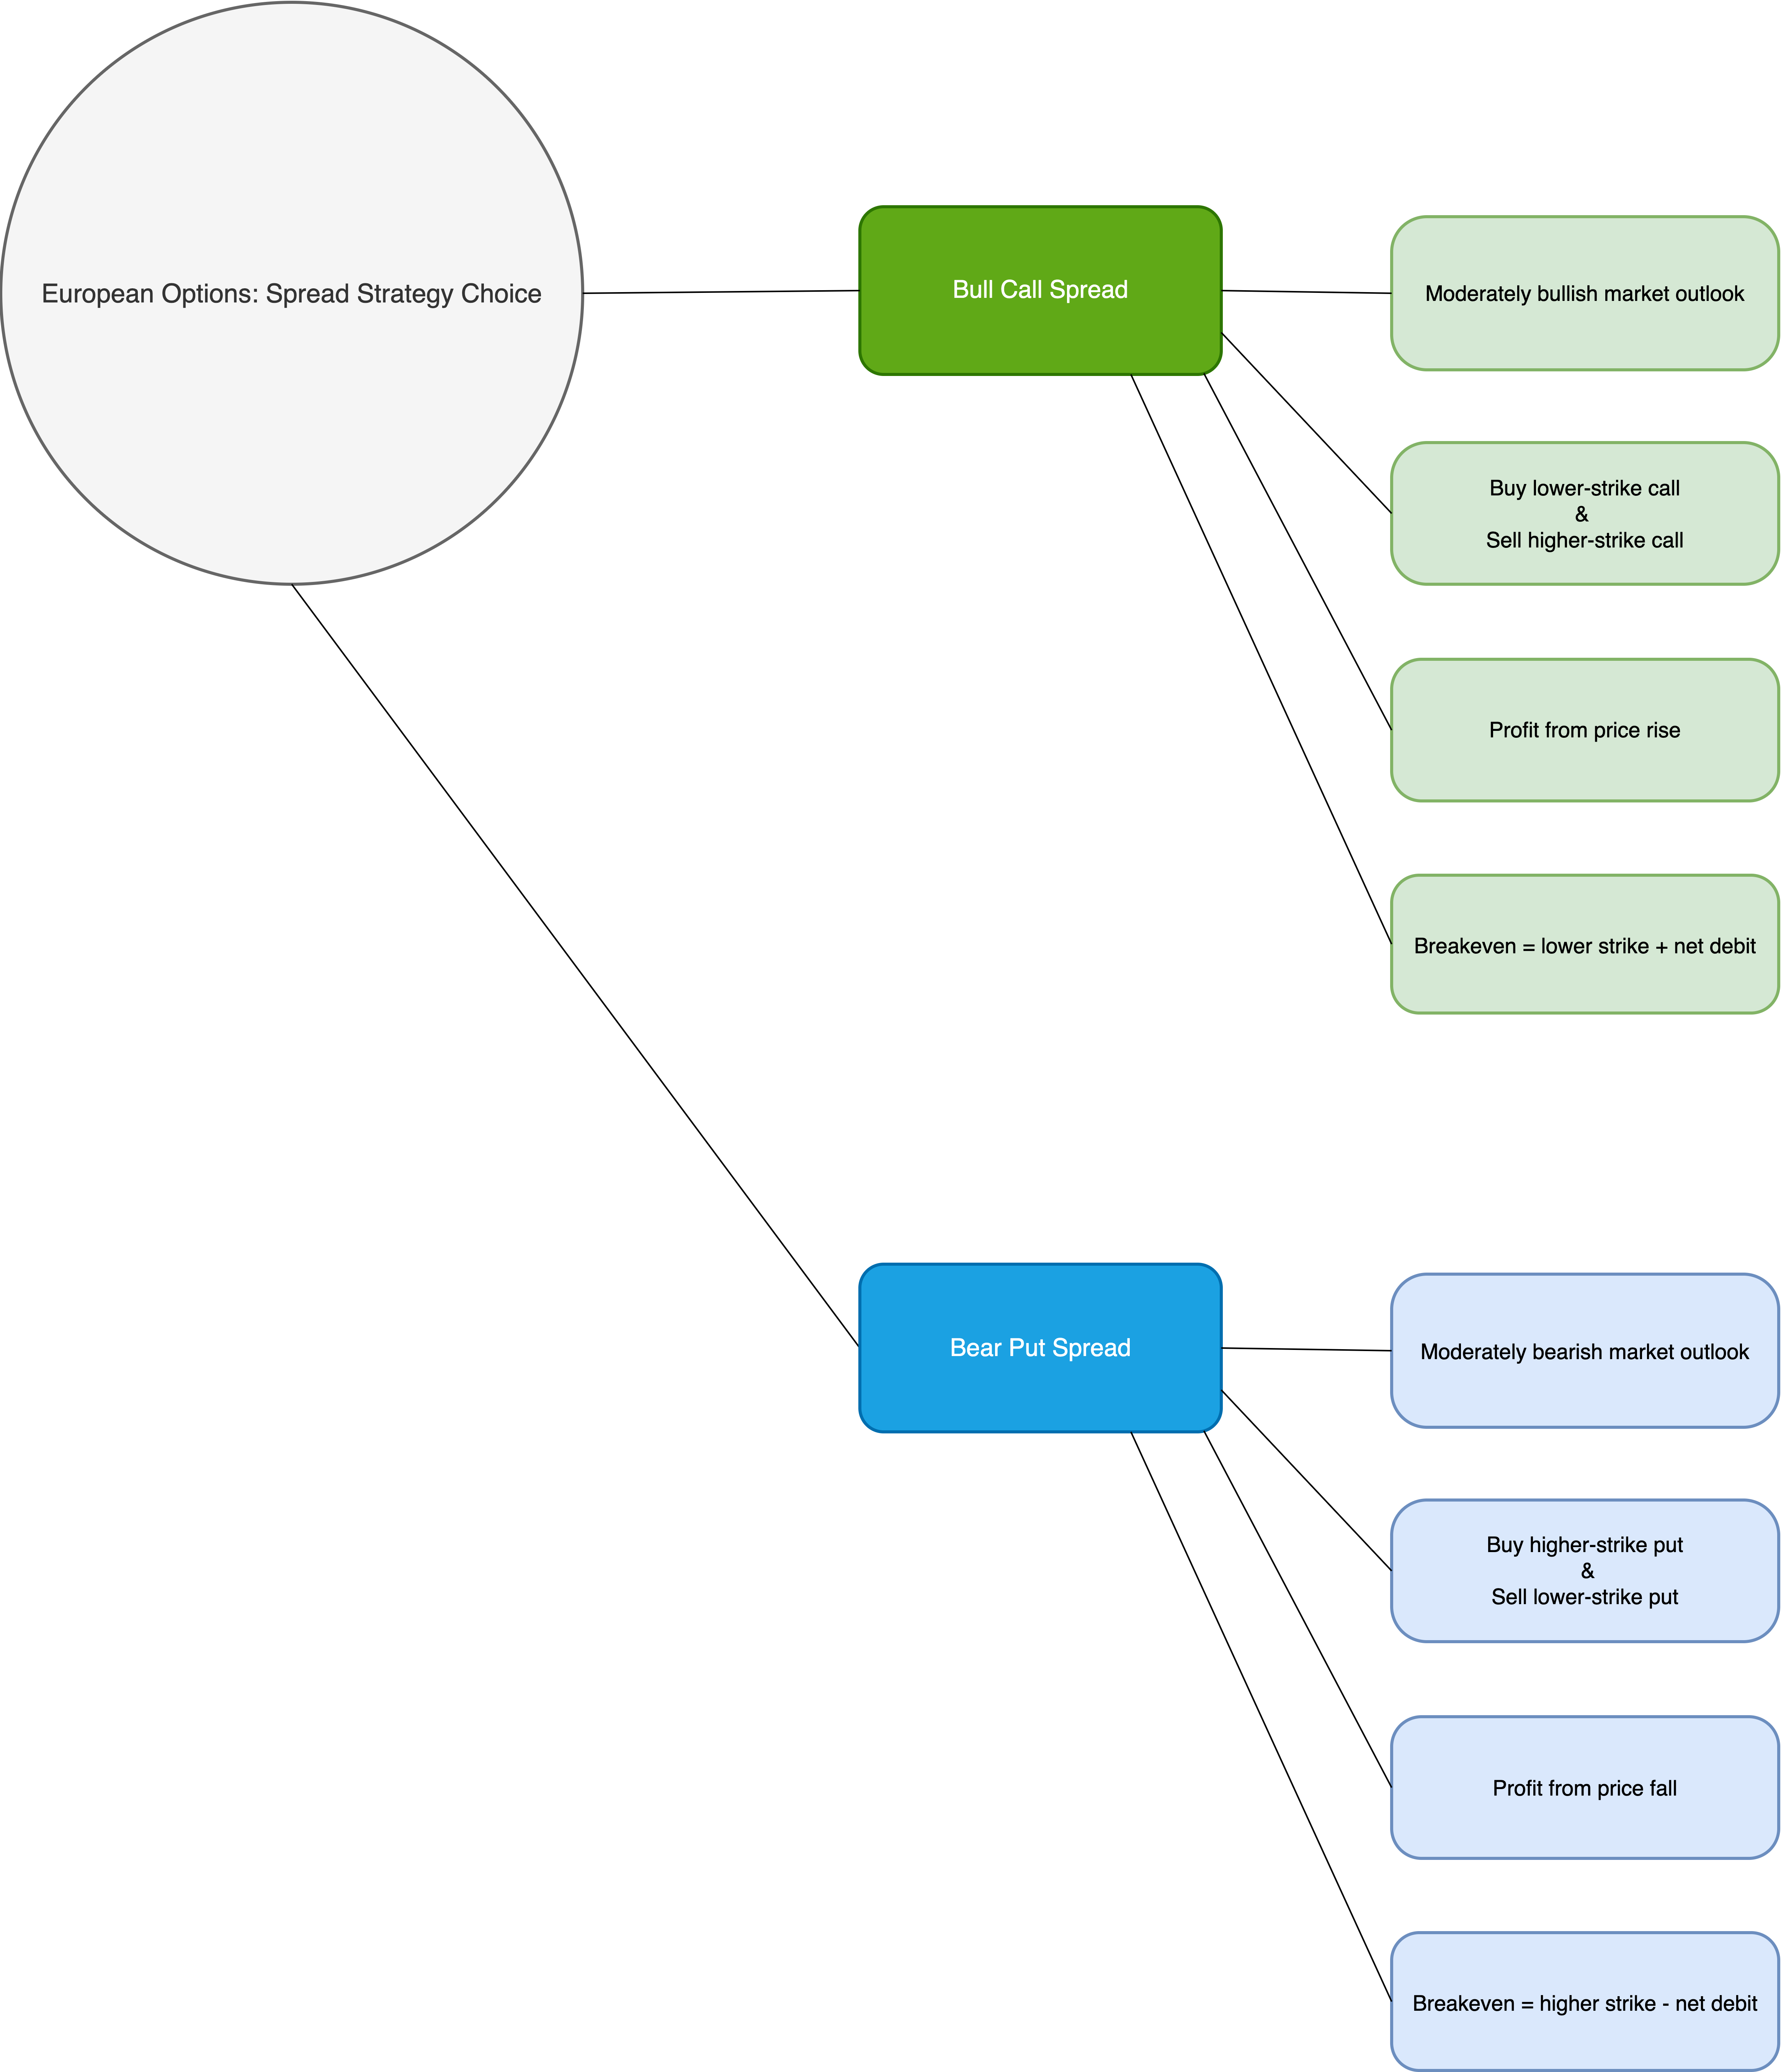
Figure 4: Bull Call Spread vs. Bear Put Spread Mind Tree
Which One Is Right for You?
If you expect a gradual upward move in the underlying and want defined risk with lower upfront cost than buying a single call, the Bull Call Spread is appropriate. It allows participation in upside movement while capping potential losses to the net debit.
Conversely, if you anticipate a moderate decline, the Bear Put Spread provides a similar defined-risk profile on the downside. It profits when the underlying moves lower but, like the bull call, limits both potential loss and gain.
Both strategies suit traders seeking clear risk limits and a moderate directional bias, differing mainly in whether you expect the market to move up (Bull Call) or down (Bear Put).
Customize the Strategy with Your Own Parameters!
Traders can fine-tune strike selection, expiry choice, stop-loss levels, and profit targets based on risk tolerance.
👉 For testing on the Phoenix platform of AlgoBulls, head over to our site now!
👉 A Jupyter notebook for this strategy is coming soon. Meanwhile, check out All Available Notebooks for Testing Custom Strategies!
Final Thoughts
The Bull Call Spread can be strengthened with active risk management, using real-time P&L tracking and flexible position adjustments to adapt quickly to changing market conditions.
Key Risk-Mitigation Techniques
✔ Incorporated in the Strategy
- Target profit & hard stop-loss: Positions exit automatically when the spread hits predefined profit or loss thresholds.
- Trailing stop-loss: Adjusts dynamically to the highest spread price, locking in gains if the market reverses.
- Re-entry logic: Helps capture extended bullish moves.
✔ Additional Enhancements
- High-frequency P&L tracking: Monitoring profit and loss at a finer interval than the candle size (for example, every 30 seconds on a 1-minute chart) provides an even faster response to sudden market shifts.
- Position adjustments: Traders can fine-tune position size or strike selection if volatility or directional bias changes during the trade.
With layered exits and re-entry, the Bull Call Spread stays responsive while maintaining defined risk - well suited to moderately bullish markets where traders seek controlled downside and the ability to lock in or extend gains.